How-To: Model Creation
A detailed how-to guide on how to build analytical models in Empower.
Overview
Before diving into the technical aspects of data modeling, it’s essential to understand a standard analytics engagement model—the strategic approach that shapes how requirements are gathered and how the model is built. First, figure out if you are going to approach model creation from a top-down or bottom-up approach.
Top-Down
Definition: You or your stakeholders have a clear target—typically existing reports or a legacy data warehouse that needs to be rebuilt or modernized.
- Begin by reverse-engineering existing reports or schemas.
- Collaborate with subject matter experts (SMEs) to understand the logic behind current transformations.
- Reconstruct the gold layer schema based on known outputs.
- Validate against legacy outputs to ensure consistency.
Use Case Example: You want to migrate your legacy sales dashboard to Empower. The modeling team reviews the dashboard’s logic, identifies the source tables, and rebuilds the gold layer to match the original KPIs.
Bottom-Up
Definition: You or your stakeholders lack a defined target. Requirements are inferred from general business goals or exploratory needs.
- Conduct discovery sessions to understand business objectives.
- Design a general-purpose schema that supports flexible reporting.
- Iterate frequently with stakeholders to refine dimensions and facts.
- Build validation loops to ensure the model aligns with evolving needs.
Use Case Example: You want to analyze customer behavior but you have no existing reports. The modeling team starts by identifying key dimensions (e.g., customer, product, interaction) and builds a schema that supports multiple exploratory use cases.
Modeling Workflow
- Requirement Gathering
- Top-Down: Extract dimensions and facts from existing reports or legacy systems.
- Bottom-Up: Conduct discovery sessions to define business goals and derive schema needs.
- Pro Tip: By the end of this step, you should have a list of required dimensions, facts, and key business questions.
- Field Mapping
- Identify which fields are needed for each dimension and fact.
- Map fields to source tables and document any transformations or joins required.
- Pro Tip: Use Empower’s metadata templates to track field lineage and definitions from source systems. Databricks Unity Catalog is great for lineage between bronze-silver-gold layers. View how here.
- Staging Notebook Development
- Build transformations in a staging notebook before promoting to gold.
- Define surrogate keys, business keys, and metadata fields early.
- Join base tables with enrichment tables (e.g., product, BOM, opportunity product).
- Pro Tip: Validate joins and transformations incrementally.
- Data Quality & Cleansing
- Address common issues like grain mismatches, duplicates, nulls, or inconsistent data formats/types.
- Pro Tip: Empower comes with a few out-of-the-box tools for duplicates and null mitigation. Check out Model, specifically the Entity Column section for details about the Missing Value field.
- Bridge Table Design (if needed)
- Introduce bridge tables when facts need to be joined directly or when many-to-many relationships exist.
- Document the logic and rationale for each bridge.
- Validation Loops
- Developer Validation: Ensure joins and transformations are technically sound.
- Power BI Developer Validation: Confirm the model supports reporting needs and that the analytics model is easily mappable to the semantic model.
- Client UAT: Validate business logic and usability with stakeholders.
- Pro Tip: Expect to revisit earlier steps based on feedback. This will be iterative!
Iteration is ExpectedModeling is not a linear process. Each validation loop may uncover new requirements or issues that require: adjusting grain, adding or removing dimensions, or even refactoring joins or bridge tables.
Building an Analytics Model
The staging notebook is the foundation of your data model. It’s where entity transformations are built, tested, and refined before being promoted to the gold layer. For developer specifics on staging transformations in Empower, read over the Staging Data Transformations section.
Preparing an Entity
You always begin entity modeling in the staging layer. Notebooks are used to pull data from silver, process it, and write to a staging layer. Use staging schemas to validate joins, transformations, and grain before promoting to gold.
Begin by answering:
- What business question are we trying to answer?
- Is this a dimension (e.g., customer, product) or a fact (e.g., sales, opportunities)?
- What is the grain of the data? (e.g., one row per product, per transaction, per day?)
Pro Tip: Dimensional ModelingFact tables store measurements associated with observations or events, like sales orders, stock balances, exchange rates, temperature readings, etc.
Dimension tables describe entities relevant to business and analytics requirements. Dimensions represent the things that you model, like people, products, places, etc.
Learn to use both entity types to build a complete analytics model.
If you need a reminder of best practices for data warehouse modeling, use the free Microsoft materials for Dimensions and Facts .
Once you've defined a modeling goal for this entity, use the Unity Catalog browser in Databricks to locate the base table in silver that would be used as the foundation of this entity (e.g. product). Also identify any enrichment tables (e.g. productdescription, productcatagory). Make sure to note any join keys needed for these tables.
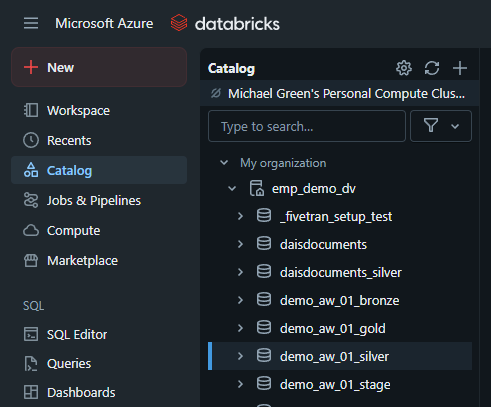
Navigating to the Databricks' Unity Catalog browser.
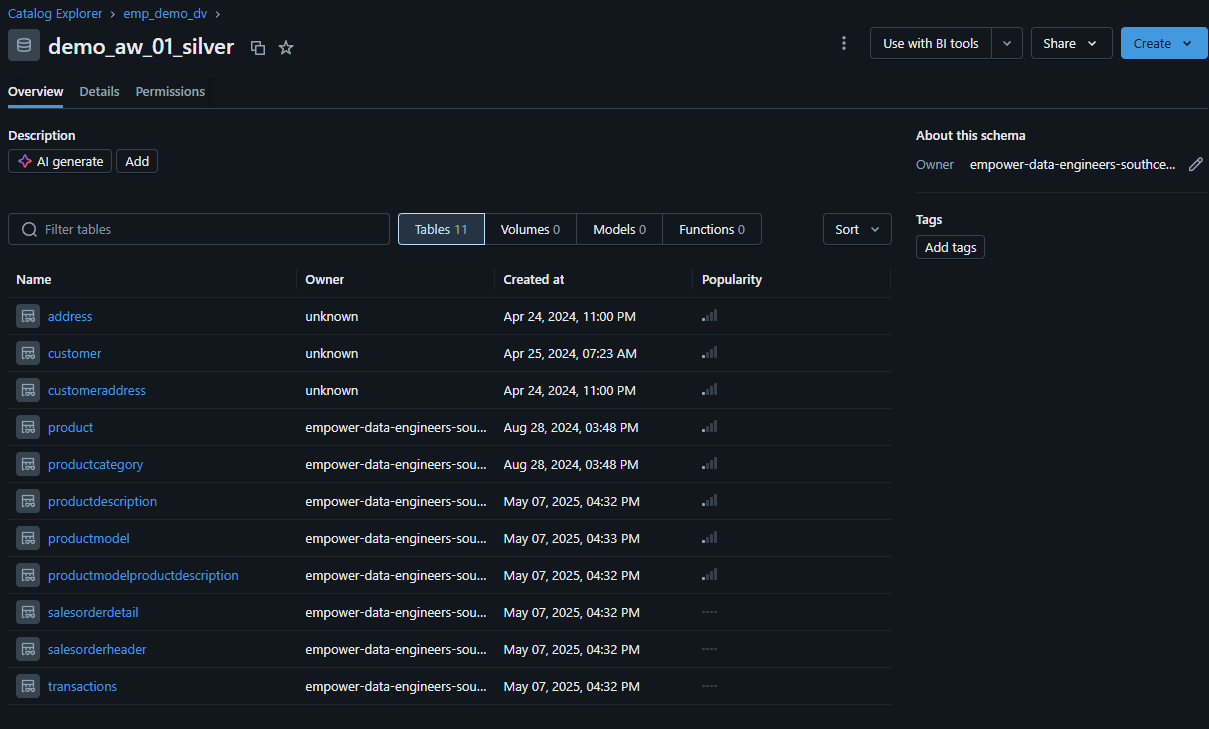
Using the Unity Catalog browser to explore the silver layer.
Next, navigate (recommended in a new tab) to the Databricks Workspace module and open up the DmBuild directory.
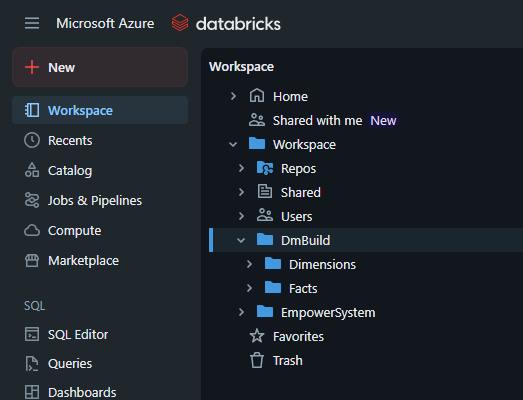
Navigating to DmBuild directory in the Databricks Workspace module.

Exploring the DmBuild directory.
DmBuild is the Empower-defined directory where you can define dimensions and facts.
Pro Tip: Use Git Folders!You can and should set up DmBuild as a Git Folder within Databricks. This will make it much easier for you to migrate pipelines in the future once you complete model development. For more information on config migration, visit the Configuration Migration page or our How-To: Pipeline Migration guide.
Writing a Staging Notebook
Create a new notebook in the fact or dimension folder, depending on which you need to make. Name it using a smart convention, like fact/dim_[name]. Be sure to add a cell block at the top of your notebook with a description of this entity.
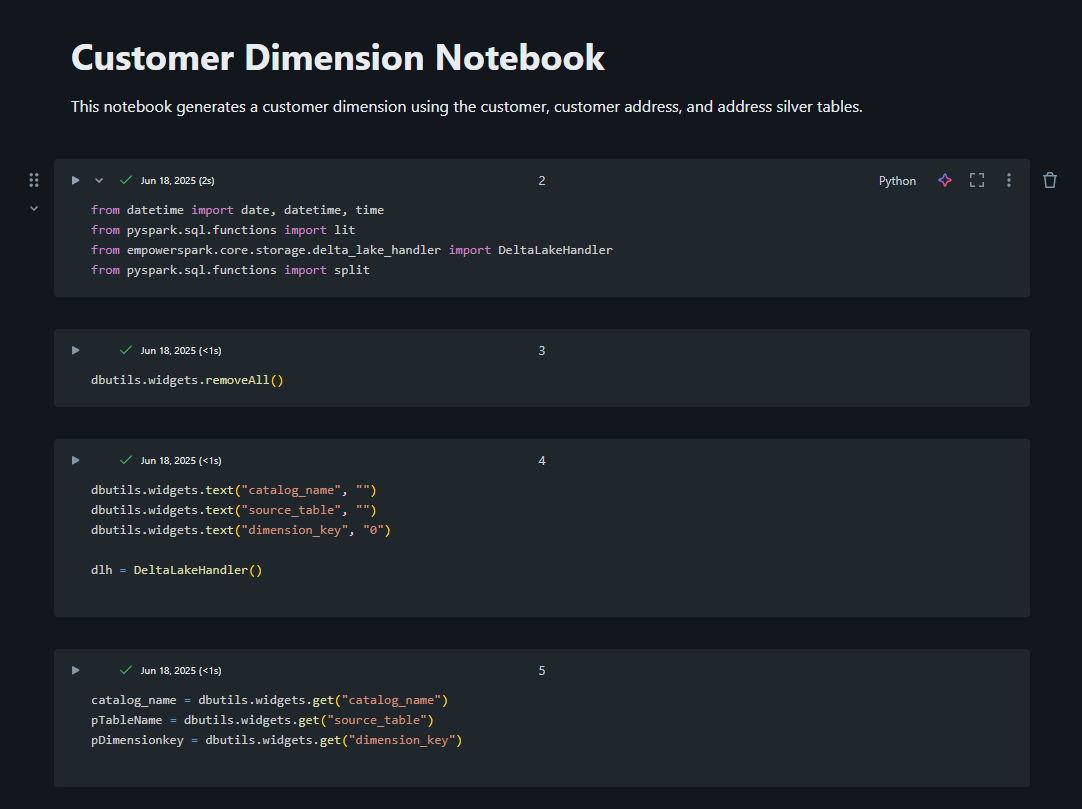
A description cell at the top of every entity notebook may save valuable time and energy in the future!
You can add details in this description cell such as:
- The name/purpose of the entity
- Grain of the table
- Source tables and join keys
There is some boilerplate code that is used in every Empower notebook entity (setting up notebook parameters, defining the stage table name and catalog, etc).
Pro Tip: Empower is deployed with a SourceQueryTemplate notebookThis notebook is the official template for all entity notebooks, and contains all boilerplate needed for an entity notebook. Copy this to create any new entities using best practices!
In the notebook, start with the base table for this entity:
- Add a surrogate key (e.g. ibfCustomerKey) that will be used to define uniqueness in the stage and gold layers
- Add joins to enrichment tables.
- Select and rename fields if needed.
- Add calculated fields.
- Filter out unwanted records.
Empower will automatically add and auto-populate standard metadata fields modifieddateutc, rowhash, and deleted_from_source when this row is merged into the gold layer in a future step.
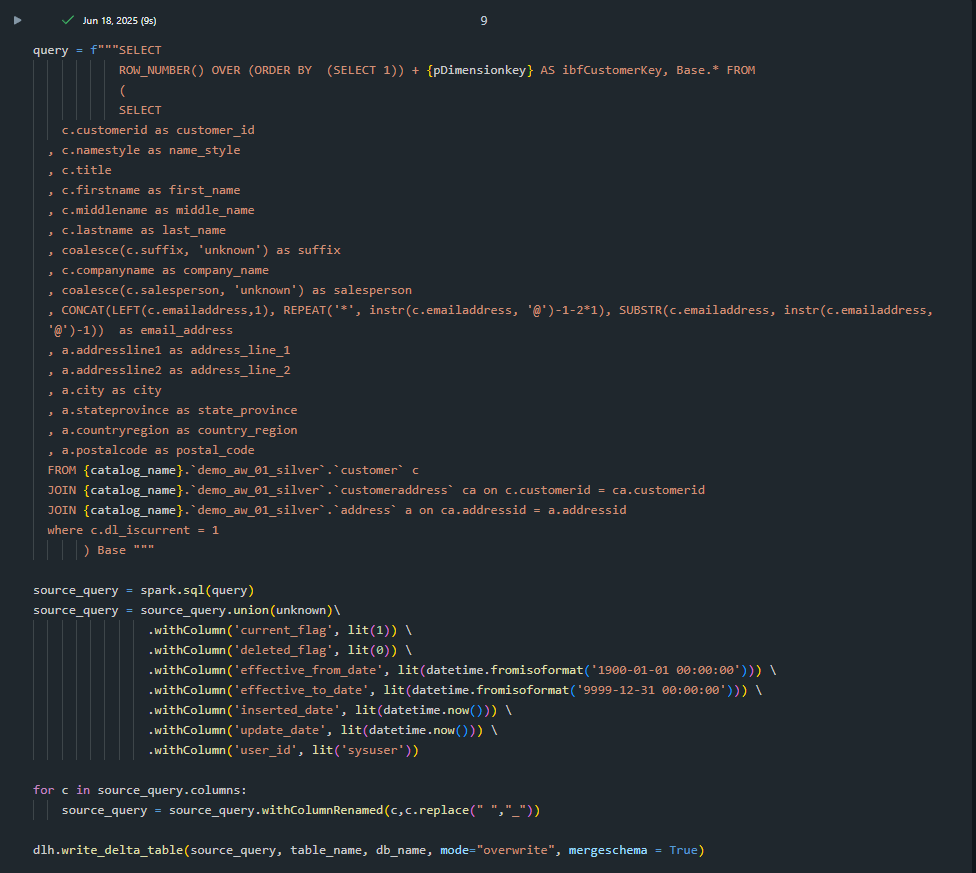
Joining the customer table with customeraddress and address to build dim_customer.
Validating Notebook Output
Running this notebook within Databricks will require the use of a Databricks cluster to execute the cell blocks. Upon completion of the staging notebook, you should see data in your staging layer that corresponds to the notebook's transformations.
- Check for duplicates or nulls that might have missed your notice.
- Confirm the grain on the table is correct.
- Run sample queries on the stage table to test joins and filters.
Once validated, you can move on to the next entity and begin the process again!
Gold Layer
After building and validating your notebooks, you are ready to do a full run of your model! Navigate to the Empower UI -> Models module. For more info about Models, view the Model page.
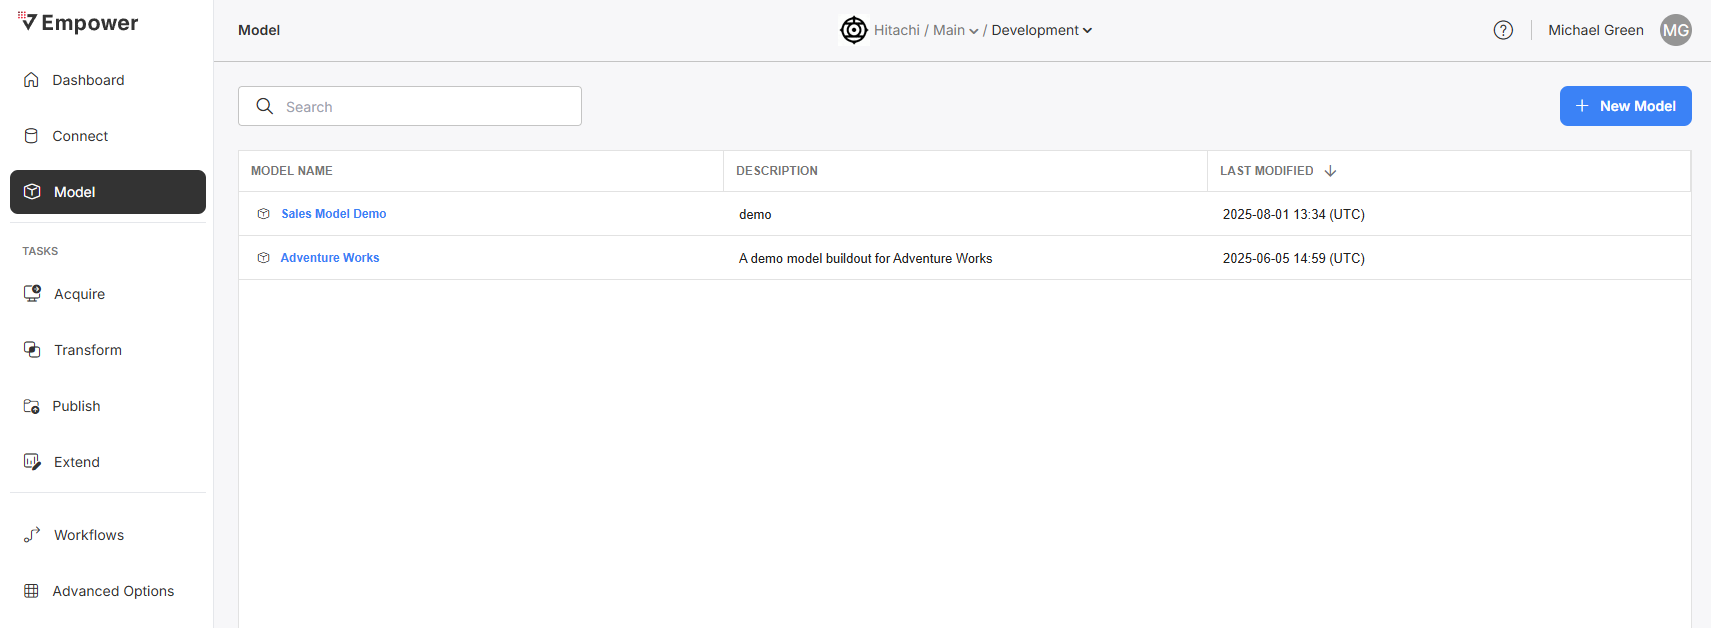
Create a model by clicking "New Model". Make sure to give it a name and description that adequately matches the model's purpose. Click into this model to view its Overview and configuration screens.
Entities
Navigate to the model's Entity screen and create one entity per dimension/fact in your model.
- Schema defines what the schema of the gold data location for this entity will be called in Unity Catalog.
- Name defines what the table name of the gold data location for this entity will be called in Unity Catalog.
- Description defines a useful freetext description for this entity. Use it to help yourself in the future or other engineers identify this entity's purpose.
- Type ID defines whether this entity is a dim or a fact, and what kind (with history, incremental, etc).
- Source Schema defines what the schema of the staging data location for this entity will be called in Unity Catalog.
- Source Entity defines what the table name of the staging data location for this entity will be called in Unity Catalog.
- Source Notebook defines the filepath of the notebook that will be run to stage the data.

Setting up the Entities for this new model.
Make sure to activate the Entities after you create their entries in the table!
Entity Columns
Navigate to the Entity Column screen and create one column for each gold-layer field in your model. Be sure to define which entity each field is for, and what type of field it is. Use good naming conventions, and take advantage of the description field to help your future self and colleagues!
Use the ordinal column to define the order columns will visualize in the gold layer.
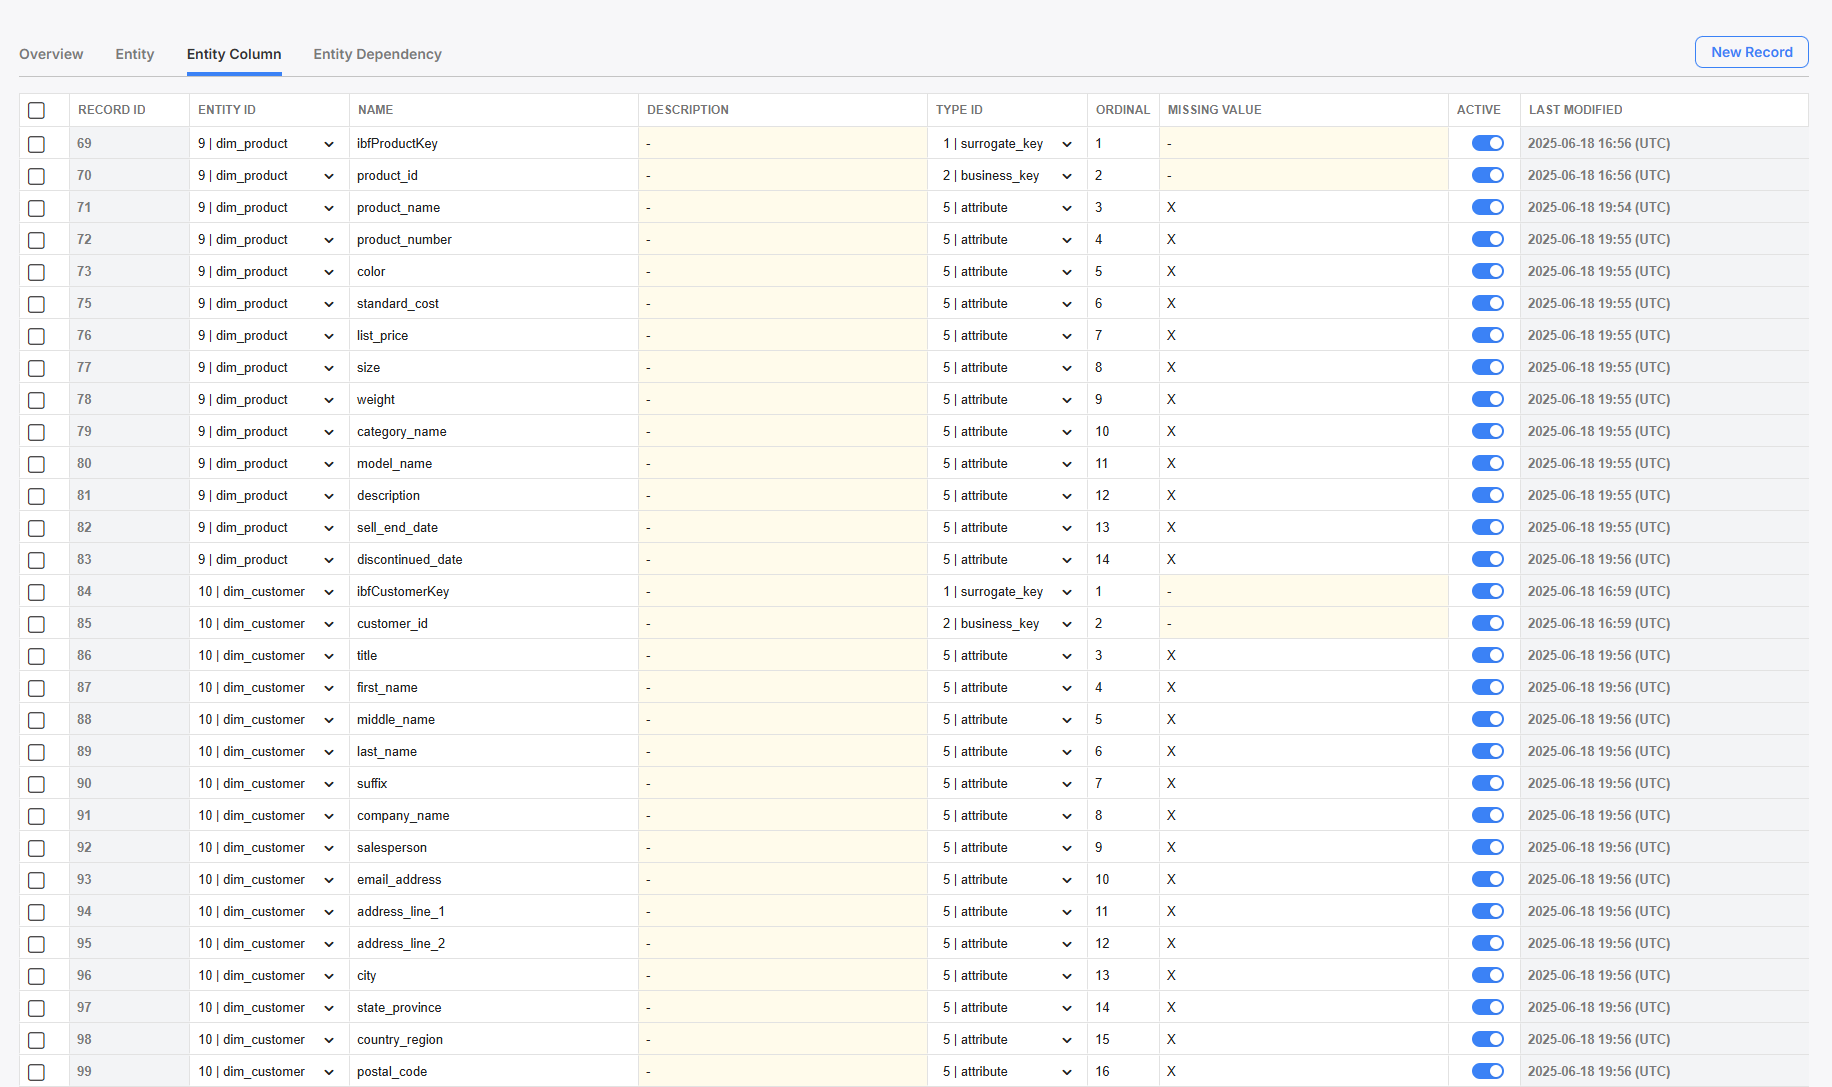
Setting up Entity Columns for each Entity.
Coming Soon: Automated Entity Column ExtractionRealizing that inputting columns for gold-layer build out is a tedious process, our product team is working hard to product an automatic extraction experience!
Soon, in a future Empower release, we will be enabling bulk entity staging and column extraction from the staging layer, so you can spend less time inputting columns when building models!
Stay tuned!
Be sure to activate your columns after you create them!
Entity Dependencies
Navigate to the Entity Dependency screen and add all Entities for this model. Remember, if the entity is not defined on this screen, even if not directly connected to any other entity, it will not be built!

Setting up Entity Dependencies between Entities.
Running and Scheduling
To run or schedule this model, you first must associate it with a Transform Task. To learn how to do so, go to the Transform module guide.
View the Schedules and Triggers to learn how to schedule and run your model as part of a Transform Task.
Updated 3 months ago
