Deployment Guide
Client Installation Prerequisites
Note: The only resource discussed in this documentation that we ask customers to create are Subscriptions. All other resources are fully templated. We only ask for configuration details to be provided.
1. Environment Planning
Hitachi recommends customers deploy three environments per organization (Development, Staging, and Production). Empower does support two other environment layouts. Learn about Empower's hierarchies within our concepts page atDocumentation on deployment hierarchies.
Best Practices call for Dev, Stage, Prod EnvironmentsFor cost-conscience customers, or customers with minimal estates, two environments may be used. Clients should understand that this mode of operation may result in less reliability since work created in Development will not have been deployed with automated CI/CD until Production deploy time. Further, there would exist no stable environment for user acceptance testing.
For enterprise customers developing high-complexity custom models, Hitachi recommends five environments (Development, DevInt, Quality Assurance, Staging, Production). This allows greater development velocity by allowing development of models to be created in Development, CI/CD to be tested in DevInt, QA to operated and verify changes in QA, End-Users to Validate in UAT, and finally deployed to production.
ActionDecide how many environments is appropriate for your company or ask to discuss the best approach with Hitachi.
After deciding environment count, Clients should determine subscription layout. In general, Hitachi recommends two subscriptions: Non-Prod, and Production. This allows better security isolation and Dev-Test MSFT pricing. Empower does support two other layouts.
Best Practices Call for >1 SubscriptionFor minimal setups we can deploy Empower to one subscription. This is heavily discouraged since it prevents Dev from relying on Dev-Test MSFT pricing and increases the risk for overprovisioning on Prod
For customers wishing to minimize additional subscription setup, it is possible to deploy Empower to existing subscriptions. This is also heavily discouraged due to lowering the level of isolation for Empower.
Hitachi feels our recommended approach can result in secure and safe environments as long as customers strictly avoid adding Contributor or above roles at the subscription level not protected by Privileged Identity Management (PIM), and instead allow Hitachi to provide resource-specific access to internal AD groups.
ActionDecide how your organization would like to layout its subscriptions and environments. When determining the name of your subscriptions, Hitachi requests that an indication of your organization name, as well as some indication of Empower be included.
2. IP Space Planning
In order to prevent any potential IP space conflicts in the future, Hitachi requests that a few IP blocks be reserved. No resources need to be deployed as part of this step, however, these blocks should not conflict with any existing private IP spaces deployed in Azure.
First: Hitachi requests one /22 block per environment This block will have half of its IP spaces used by Hitachi for our Databricks deployment. The other half will be reserved for future or custom features that may need to be added to Empower.
Best Practices call for IP Reservation BlocksWhile this may seem like a lot of IP addresses per environment, because any change in IP space will require a full Databricks redeployment, we wish to reserve a large block ahead of time in order to prevent such an expensive redeployment from occurring.
Second: Hitachi requests one /24 block for Unity Catalog. If you are not familiar with Unity Catalog, we go into much greater detail later on in this document and would be happy to answer any questions.
Skippable Step!If you already have Unity Catalog deployed in the Azure region you wish to deploy Empower to, this step may be skipped
View our page on IP Space Reservation Request for more help and guidance.
3. Provide the Hitachi Team with your Configuration Details
An Excel document will be provided to your team with configuration values needed for our automated deployment.
ActionPlease complete this Excel document as well as provide the Hitachi team with any naming convention documentation your team uses. If you lack naming convention rules for your team, we would be more than happy to provide Microsoft recommended naming conventions.
Warning: Immutable Names!Any names used in the deployment of infrastructure cannot be changed after deployment. This is true of the vnet IP address blocks as well. If name changes are critical, this may require deployment of the entire estate.
Redeployment may incur additional costs.
4. Onboard the Solution to Empower
As a Platform as a Service (PaaS) offer built on Azure, the next step is to onboard the solution into Hitachi Solution’s licensing and management if using one or more subscriptions for the Empower installation.
As a user with Owner role over the subscription(s):
- Click “Create a Resource” on the home page, or in the top left of the page.
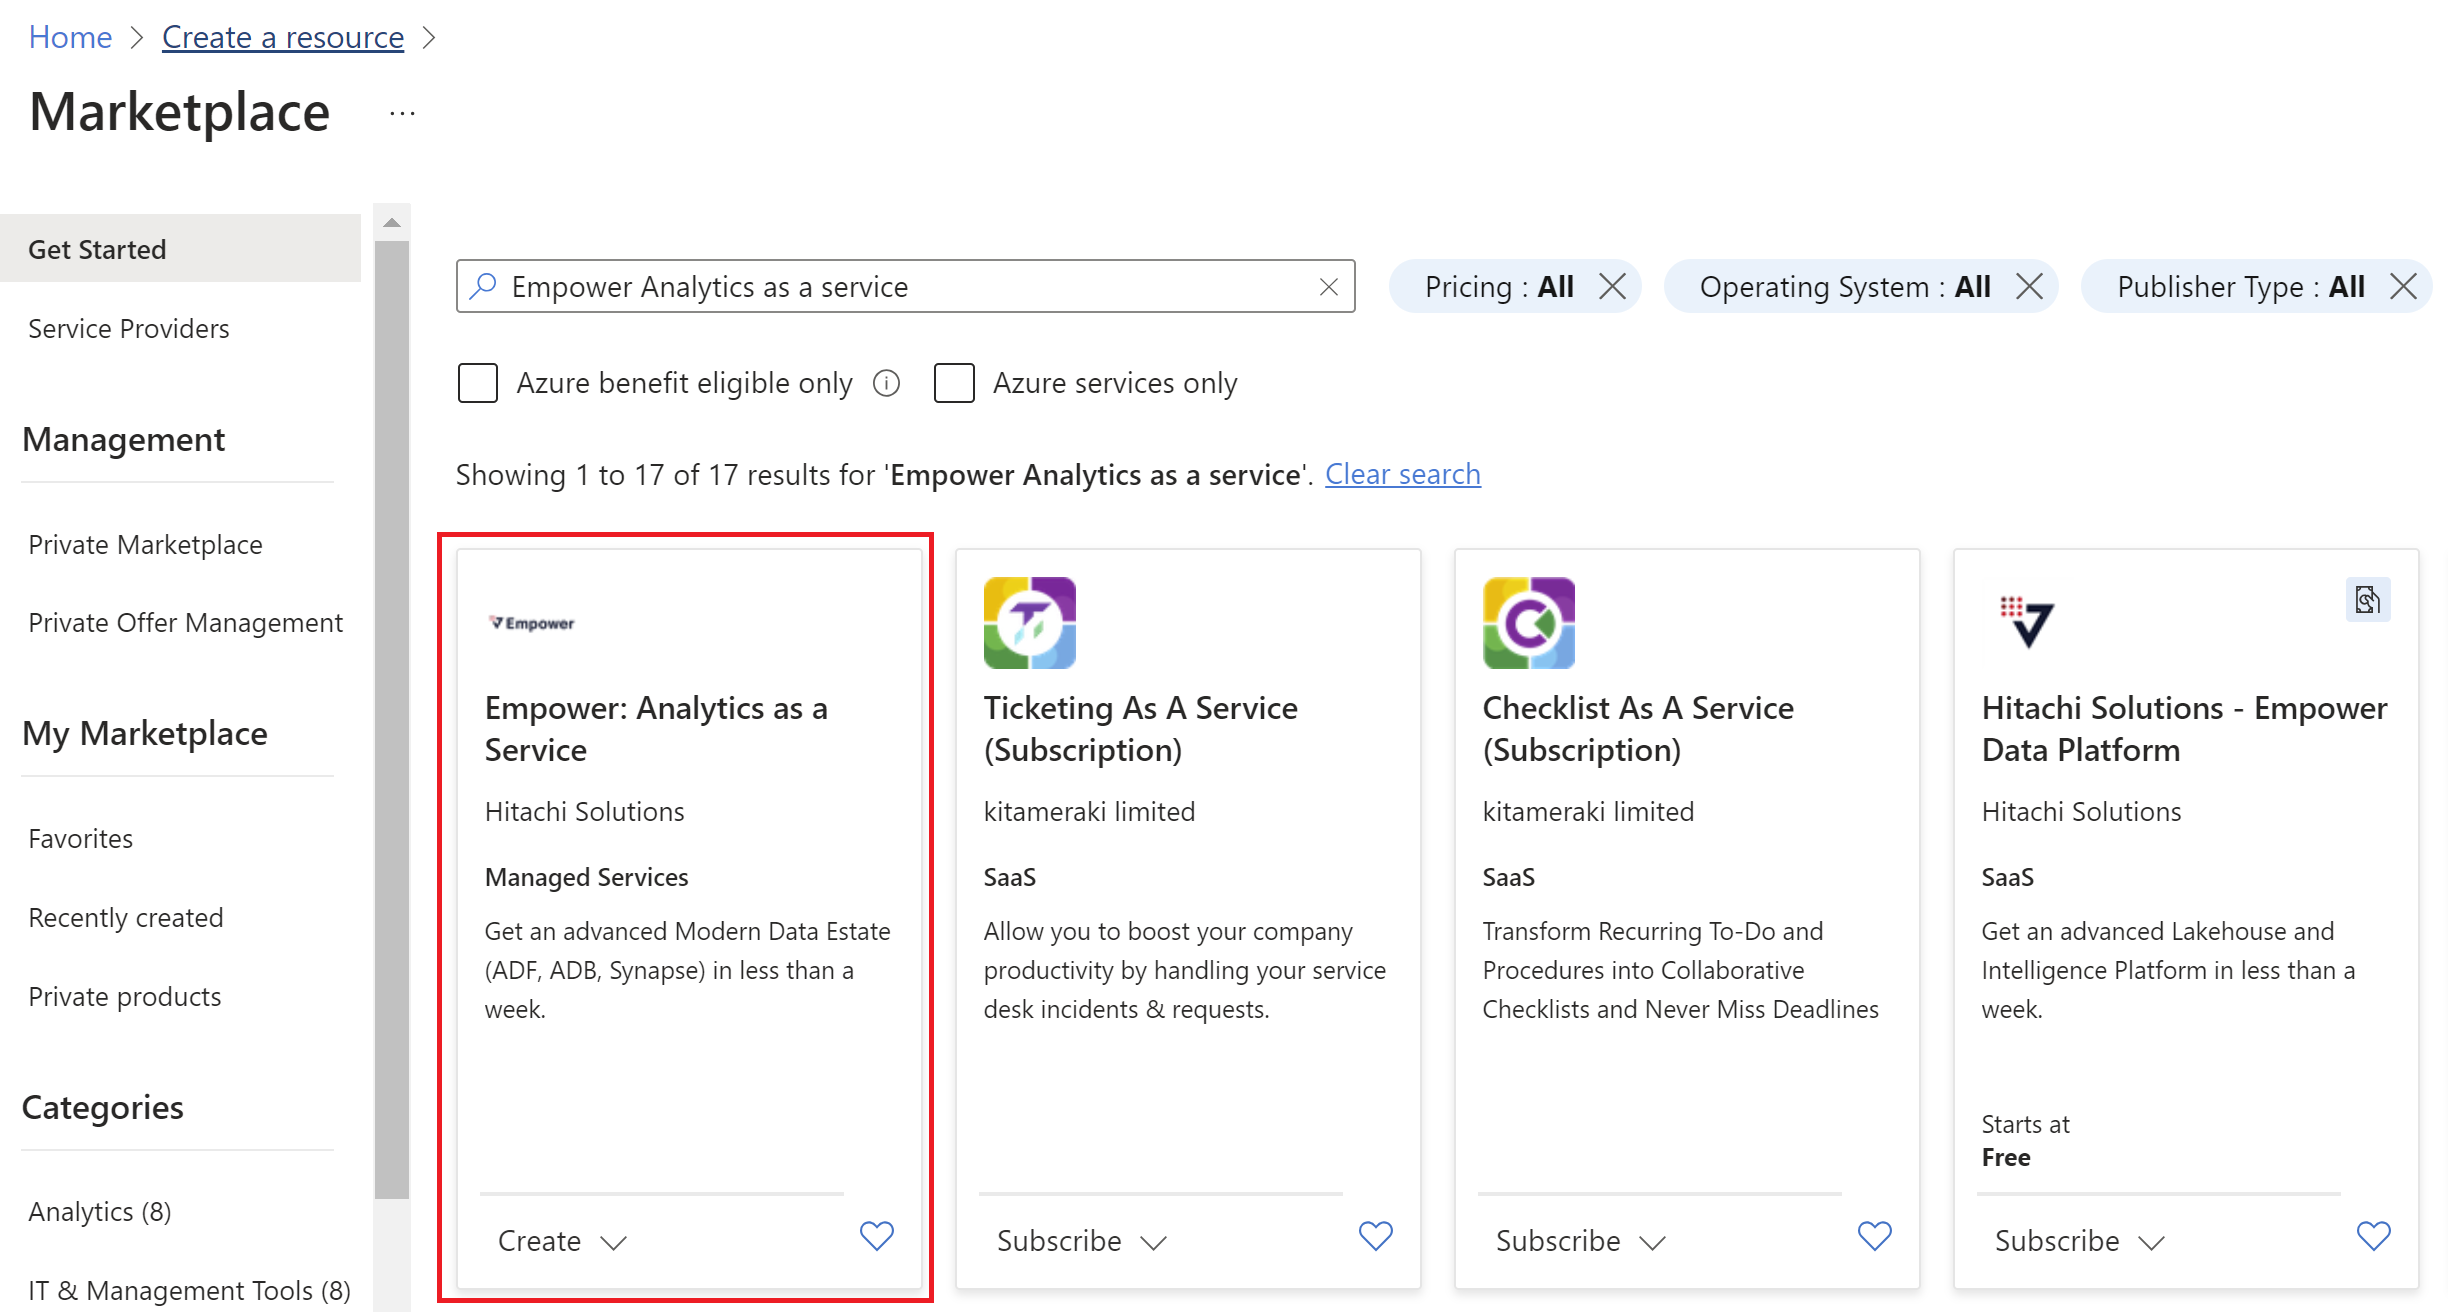
- Search for “Empower: Analytics as a Service” and click the offer that shows “Managed Service” in the box. (See screenshot) Note: You must create the resource form the "Create" dropdown due to a bug on Microsoft's side. Do not click on the resource itself.
- Select the correct subscription. If there are more than one, we will repeat this deployment.
- Select the same region as the desired region for the solution. If not known, speak to the Empower team.
- Click Review and Create. Note that name and description are optional and may be left as default.
- Check the box to agree to the terms, and press “Create.”
- Repeat, as needed, for any remaining subscriptions to be onboarded.
- Finally, please complete the subscription delegation steps outlined on the Delegating your Subscriptions page.
If using a shared subscription that contains non-Empower resources in that subscription container:
Best Practices - Not Recommended for ProductionThis method isn't recommended for production for reasons discussed above. If possible, create subscriptions specifically for this deployment.
Create a JSON file called empower-rgsetup-params1.json in a directory locally, with your resource groups filled out for each subscription you plan to deploy to. If you have multiple subscriptions, create multiple uniquely named files.
{
  "$schema": "https://schema.management.azure.com/schemas/2015-01-01/deploymentParameters.json#",
  "contentVersion": "1.0.0.0",
  "parameters": {
    "resourceGroups": {
      "value": [
        {
          "rgName": "RG-NAME-1"
        },
        {
          "rgName": " RG-NAME-2"
        },
        {
          "rgName": " RG-NAME-3"
        }
      ]
    }
  }
}
As a user with Owner over the subscription, run the following commands in Azure CLI:
# Log in first with az login if you're not using Cloud Shell
az login

# Deploy external Azure Resource Manager template, with local parameter file
# Be sure to specify the correct subscription id for each param file
#
# Note: the location of the deployment does not matter (region simply must be online)
az deployment sub create --name EmpowerOnboarding --location EastUs2                     --subscription <SubscriptionId> --template-uri ‘https://hsaltemplatedeploymentpd.blob.core.windows.net/public/empower-rgsetup-template.json’ --parameters @empower-rgsetup-params1.json –verbose

# Repeat for all subscriptions (if multiple)
5. Onboard the Empower Infrastructure "Empower-Service" Managed App into your Entra ID (formerly Azure Active Directory) Tenant
Ask your Entra ID Admin to onboard the Empower Service into your directory. As a deployment service, this app requests permission from your administrator to read the active users and services in the environment, as well as create service principals, which it manages and assigns to Azure Databricks and other services. If you have questions about what this application will do in your tenant, please see these docs
This link will take you to a permission overview screen where you can preview the permissions being requested.
- Link: https://login.microsoftonline.com/common/adminconsent?client_id=9351f38a-380b-4255-9b08-7d2710871879&redirect_uri=https://app.empoweranalytics.io
- Note: Replace ‘common’ in the URL above with your tenant id.
6. Onboard the SSO "Empower" Managed App into Your Entra ID Tenant
After onboarding the "Empower-Service" for infrastructure, we need to provision a way for your users to log in to our UI. Ask your Entra ID Admin to onboard "Empower" into your directory. As a service principal for login, this app requests minimal permissions since it is used for the Empower UI.
This link will take you to a permission overview screen where you can preview the permissions being requested.
- Link: https://login.microsoftonline.com/common/adminconsent?client_id=937a521f-8ece-499b-80a2-9f964d27731e&redirect_uri=https://app.empoweranalytics.io
- Note: Replace ‘common’ in the URL above with your tenant id.
After the Empower deployment, follow instructions on the Adding Users to SSO page for adding users to this SSO application.
7. Onboard the SSO "Empower-DirectorySync" Managed App into Your Entra ID Tenant
Ask your Entra ID Admin to onboard the Empower DirectorySync Service into your directory. As a service that allows users to grant each other access to, this app requests permission from your administrator to read the active users and services in the environment.
This link will take you to a permission overview screen where you can preview the permissions being requested.
- Link: <https://login.microsoftonline.com/common/adminconsent?client_id=786fe01e-af93-443b-b43a-d78a2ef560a0&redirect_uri=https://app.empoweranalytics.io>
- Note: Replace ‘common’ in the URL above with your tenant id.
8. Grant requested Azure access to Hitachi Users and Service Principals
Note: For access-related questions please see the Empower Access Details documentation
- For each Empower subscription (if using subscriptions dedicated to Empower), grant the clientid for Empower-Service Owner. If delegating only certain resource groups, grant reader at the subscription level and Owner at the RG level.
- Grant requested Azure access to Hitachi Employees. This access request will be sent over email by the Hitachi Delivery Manager.
9. Register Subscription Resource Providers
In order to deploy Empower, the following resource providers need to be registered in all deployment subscriptions:
- Microsoft.ManagedServices
- Microsoft.Compute
- Microsoft.KeyVault
- Microsoft.DataFactory
- Microsoft.Network
- Microsoft.Databricks
- Microsoft.Storage
- Microsoft.Sql
- Microsoft.Insights
- Microsoft.OperationalInsight
- Microsoft.Synapse
- Microsoft.EventGrid
- Microsoft.Security
Launch a PowerShell window, login to your Azure tenant and run the following script. Please replace the relevant variables at the beginning of the script.
Alternatively, these can be quickly registered manually by navigating to the Subscription(s) in Azure portal. Then clicking on the left menu -> under Settings -> select Resource providers. For each provider above, click “Register.”\
Connect-AzAccount -Tenant <your tenant id>

$AzureSubscriptions = @(
    '<your prod subscription id>',
    '<your non prod susbcription id>'
)

$ResourceProviders = @(
    'Microsoft.ManagedServices',
    'Microsoft.Compute',
    'Microsoft.KeyVault',
    'Microsoft.DataFactory',
    'Microsoft.Network',
    'Microsoft.Databricks',
    'Microsoft.Storage',
    'Microsoft.Sql',
    'Microsoft.Insights',
    'Microsoft.OperationalInsights',
    'Microsoft.Synapse',
    'Microsoft.EventGrid',
    'Microsoft.Security')

foreach ($Subscription in $AzureSubscriptions) {
   Set-AzContext -SubscriptionId $Subscription

    Write-Host "Registering resource providers for subscription with id $Subscription" -ForegroundColor Cyan;
    foreach ($providerNamespace in $ResourceProviders) {
        Write-Host "Registering resource provider '$providerNamespace'" -ForegroundColor DarkGray;
        Register-AzResourceProvider -ProviderNamespace $providerNamespace -ConsentToPermissions $true
    }
}
See MSFT Documenation to learn more about resource providers.
10. Set Resource Quotas
Several quotas will need to be increased for Empower to work properly. These quotas only need to be raised in the Azure region and subscriptions you want Empower deployed to.
Microsoft Documentation for quota increase.
Compute:
- Standard DS_v3, Standard EDSV4 → 350 vCPUs per environment in the subscription
- These are used by databricks to spin up clusters running on Azure Virtual Machines. The high count will prevent any overnight pipeline failures, but we do not expect these quotas to be hit.
- Ensure that the total regional VCPUs capacity has enough headroom to accommodate these quota limits.
- Additional quota TBD by your platform team.
Networking:
- PublicIpAddresses - Basic
- 256 addresses per environment in the subscription
11. Integration Runtime Setup
Please refer to the following subpage to setup the integration runtime. Integration Runtime Setup
12. Unity Catalog Setup
Please refer to the following subpage to setup Unity Catalog. Unity Catalog in Empower
Deployment
After the above steps are completed, please notify your Delivery Manager and Deployment Engineer to get the process triggered. You will be asked to review the final resource names, then the process will begin. Most deployments are out of the queue and complete within one business week.
What should I do to prepare for the next phase?If you have completed the above steps, please notify your Delivery Manager, and review the post-deployment steps.
Updated about 1 month ago