Empower Basics
Learn the key building blocks and Empower lingo.
What Empower Does
Most organizations store data across many different systems - ERP, CRM, finance, supply chain, and more. While these systems are necessary, they create data silos that make it difficult to build consistent, reliable data pipelines and a unified view of the business.
Empower is a data acceleration layer that helps you standardize, orchestrate, and operationalize data across your organization and get to usable data and value quickly.
Empower is deployed into your Azure tenant and sits on top of your existing data platform (Databricks and/or Microsoft Fabric). Empower works alongside your data platform it to accelerate delivery, reduce manual effort, and enforce consistency using repeatable patterns and a proven architecture.
Where Empower and Your Data Lives
Empower is deployed within your Azure tenant and is designed to work with your broader Azure data ecosystem. It provides a consistent layer for configuring, managing, and orchestrating data movement, while your underlying storage and compute remain in your Azure services.
All data processing and storage occur within your Azure tenant. Empower coordinates how data is ingested, transformed, and delivered between those services, helping standardize workflows and reduce manual effort. Because everything runs within your environment, you maintain full control over your data, security, and access at all times.
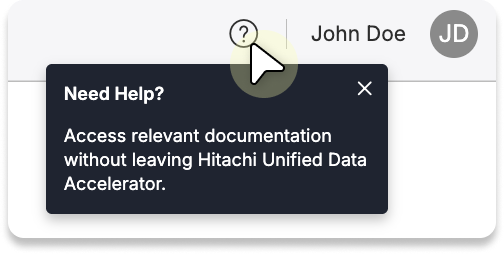
Need Help?If at any time you're working in the Empower app and need guidance on setting something up or understanding a specific field, simply click on the Quick Help button, represented by the question mark icon in the header.
This button opens a side panel with documentation tailored to the page you're viewing, providing instant access to the information you need without interrupting your workflow. Whether it's step-by-step instructions or detailed explanations, Quick Help ensures you have the support you need right within the app.
How Empower Works
From a high-level, Empower allows you to acquire, or pull in, and centralize data from multiple sources, such as SQL Server, CRM system, and many (over 400!) more into your Data Lakehouse.
You can then transform this raw data into a more useful format that allows you to create the reports and metrics you need.
You can also extend beyond typical standard data movement processes to connect Empower with external Azure and Fabric services for advanced automation and integration within an overall end-to-end data movement pipeline.
Finally, you can publish any data, transformed or not, outside of the Lakehouse to a variety of different data sources.
Each of these steps is referred to as a Task.
Empower allows you to do all of this through an easy-to-use interface in just a few simple steps:
- Configure the connections you want to pull data from and push data to.
- Define the steps that will acquire, transform, extend to other services, and publish your data.
- Chain those data flow steps using Workflow to create your full, end-to-end data movement orchestration.
Let's look at what each of these means a bit more below.
Connect to Your Data
The first thing you'll want to do is define and configure all of the connections to the systems you want Empower to connect with, i.e. pull data in from and push data out to.
Empower has over 400+ pre-built connectors that make it easy for you to set up in just a few minutes.
To learn more about what connectors are available and how to use them, visit our Connect page.
Configure Data Movement with Tasks
Empower separates the core data movement functions of acquiring, transforming, and publishing the data into modular, re-usable steps called Tasks.
There are four different types of Data Flows that you can create:
-
Acquire Tasks ingest data from sources. All of Empower’s connectors support automatic schema drift and are designed to be straightforward: you configure which data, and the tool handles the mechanics of extraction.
Learn More about Acquire Tasks → -
Transform Tasks transform the data into usable information within the Lakehouse. As a user, you may customize these transformations to your heart's content: Empower supports notebook execution. All you need to do is define the data transformation logic as SQL statements.
Learn More about Transform Tasks → -
Publish Tasks writes data to external systems, such as Power BI, SQL servers, SFTP systems, and Dynamics CE or F&O.
Learn More about Publish Tasks → -
Extend Tasks executes any specified custom notebook, making them ideal for running custom logic beyond the standard data flow types.
Learn More about Extend Tasks →
Model
A Model in Empower defines the structure, relationships, and business logic for your data within the Lakehouse. Models standardize how data is organized, making it easier to transform, analyze, and publish consistent, reliable information across your organization.
The Model module lets you define, manage, and organize the structure and logic for your analytical data in Empower. Each model contains the configuration needed to transform raw data into Gold Layer entities - tables optimized for reporting, analytics, and downstream processes. Models are central to how Empower standardizes, builds, and maintains reliable data pipelines across environments.
Workflows
Once you have created a Task, you can use it in any number of Workflows. Workflows allow you to chain together Tasks in any sequence to create complete end-to-end data movement pipelines custom to your needs. Because Tasks are created outside of Workflows, they can be configured once and used many times.
Read more about Workflows and how to use them here: Workflows Overview.
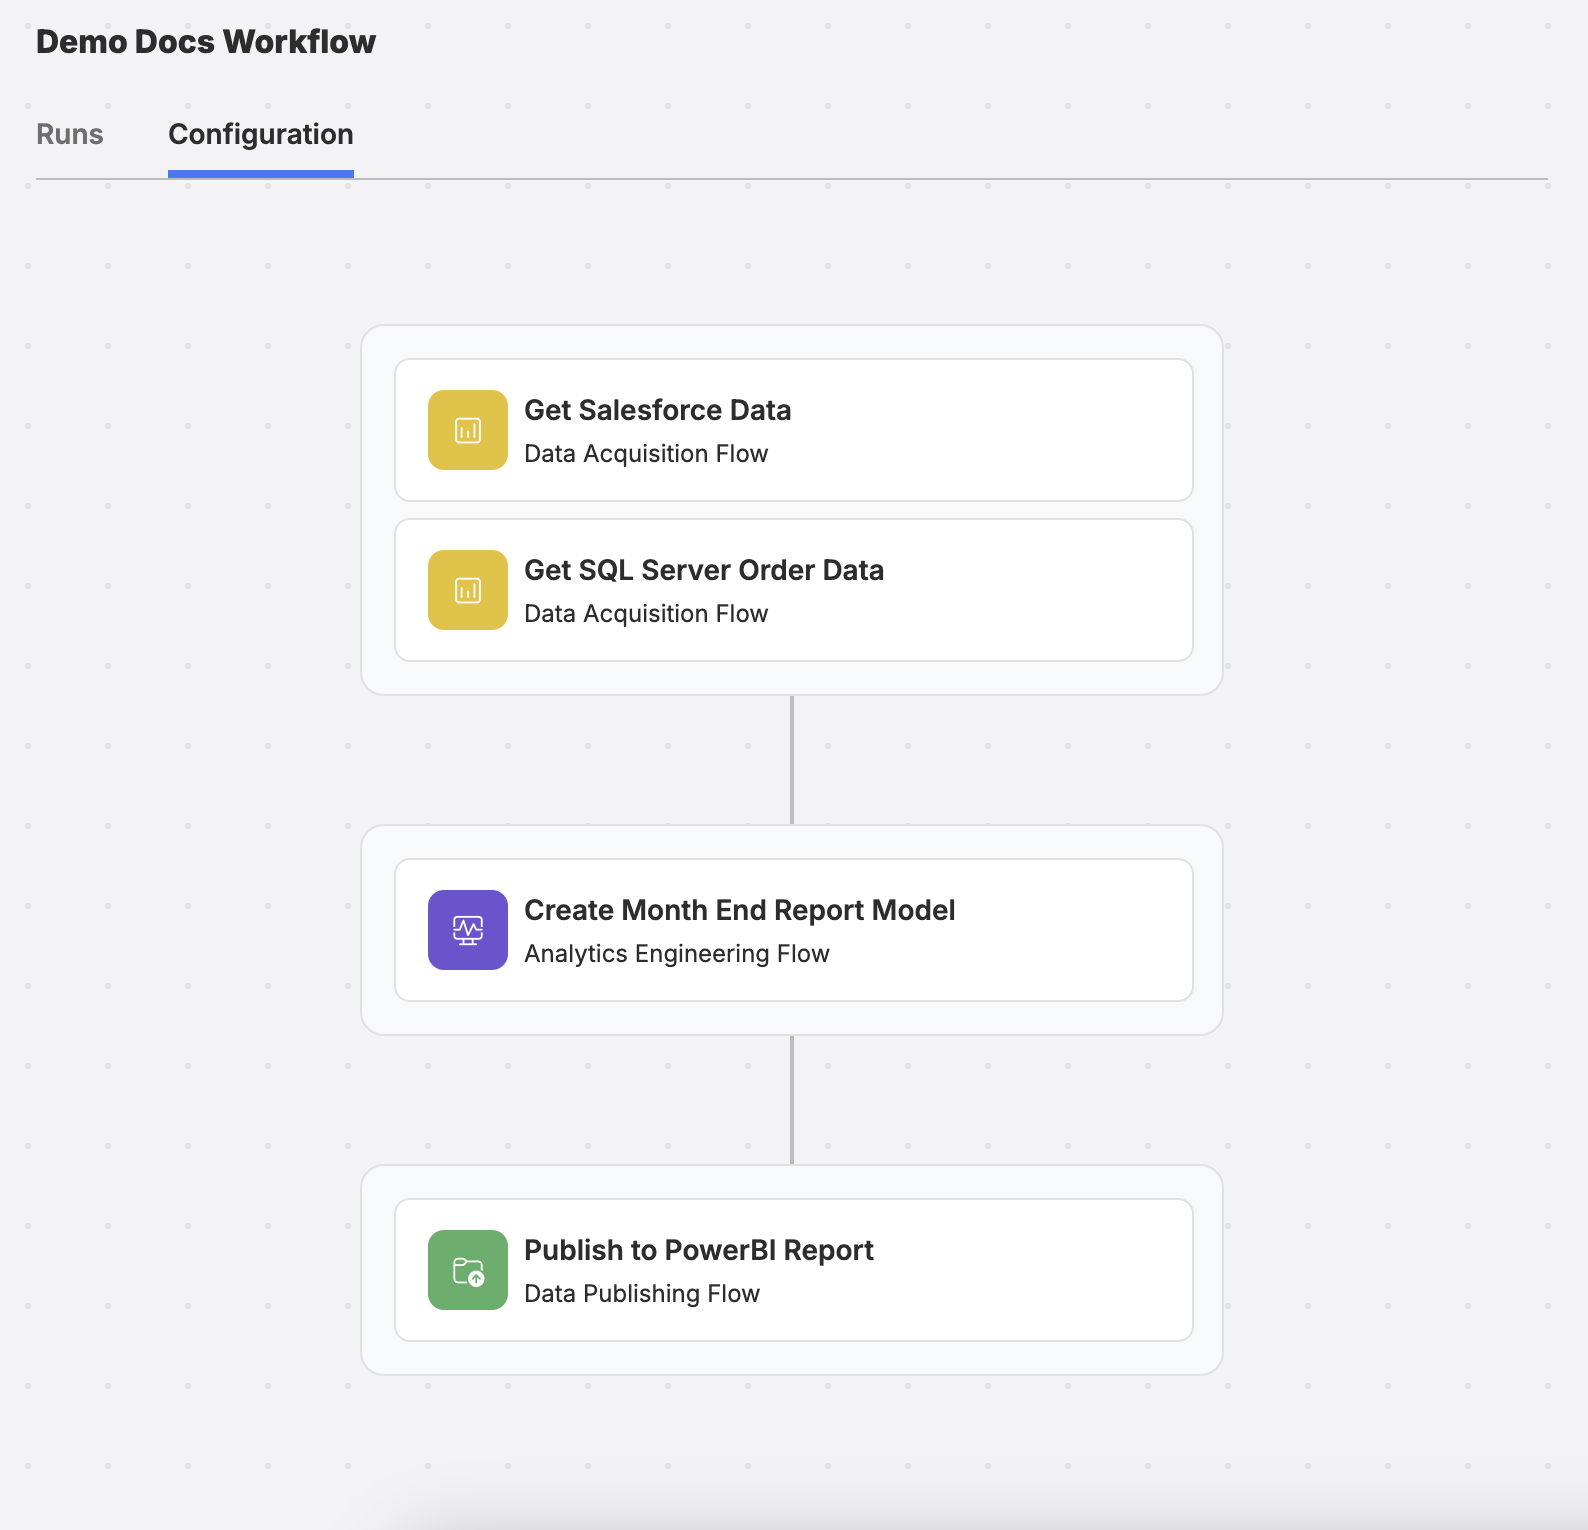
Example linking multiple Data Flow steps to create a Workflow
Environments
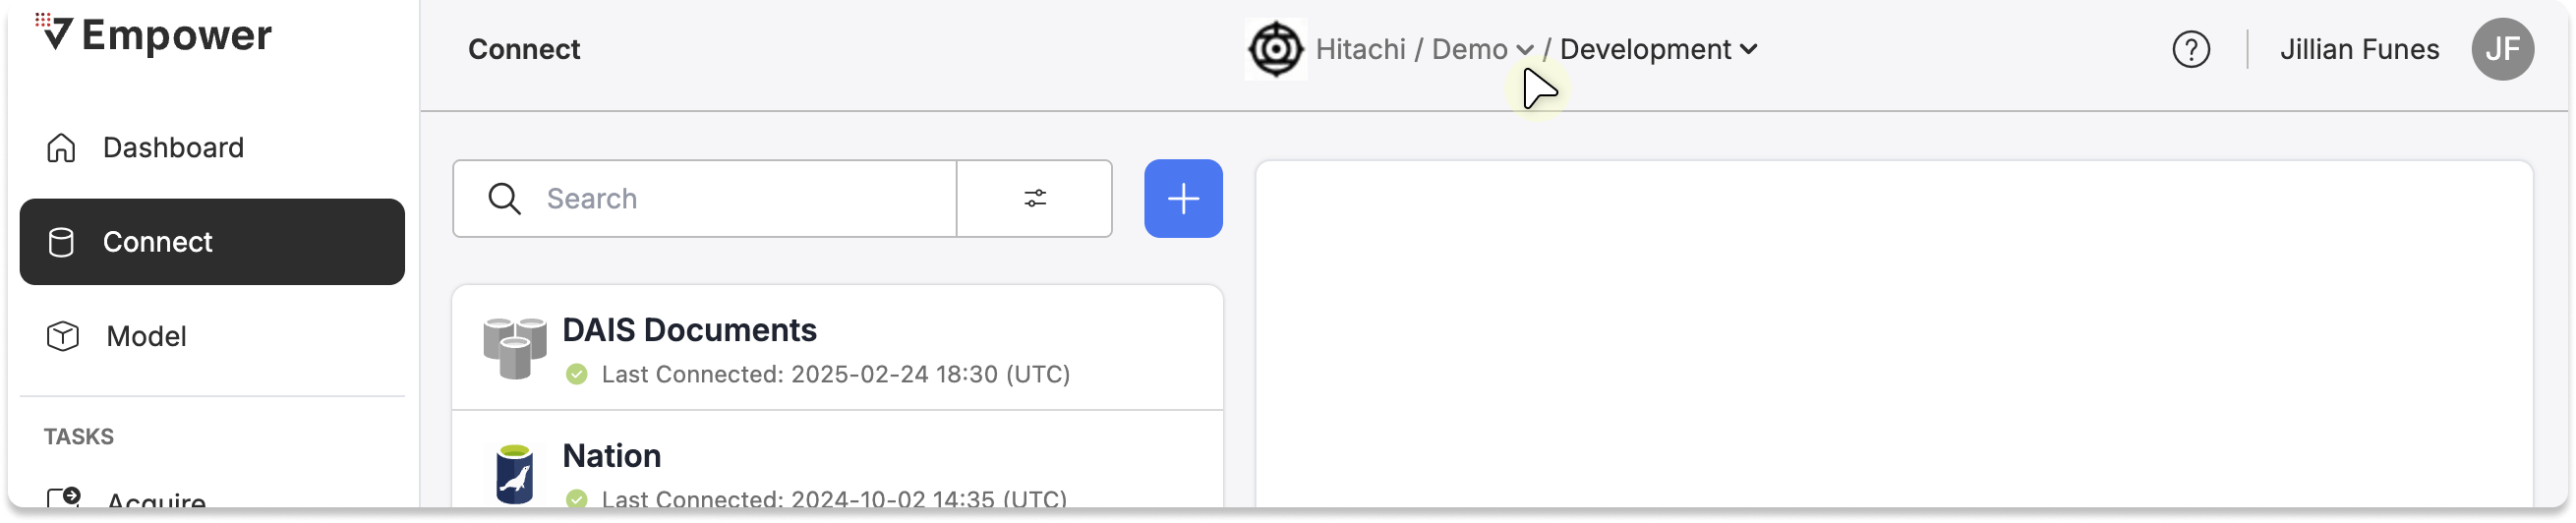
The first thing to know is that Empower is organized into three levels: Enterprise, Organization, and Environment.
Understanding how these levels relate helps clarify how data, access, and migrations are structured.
-
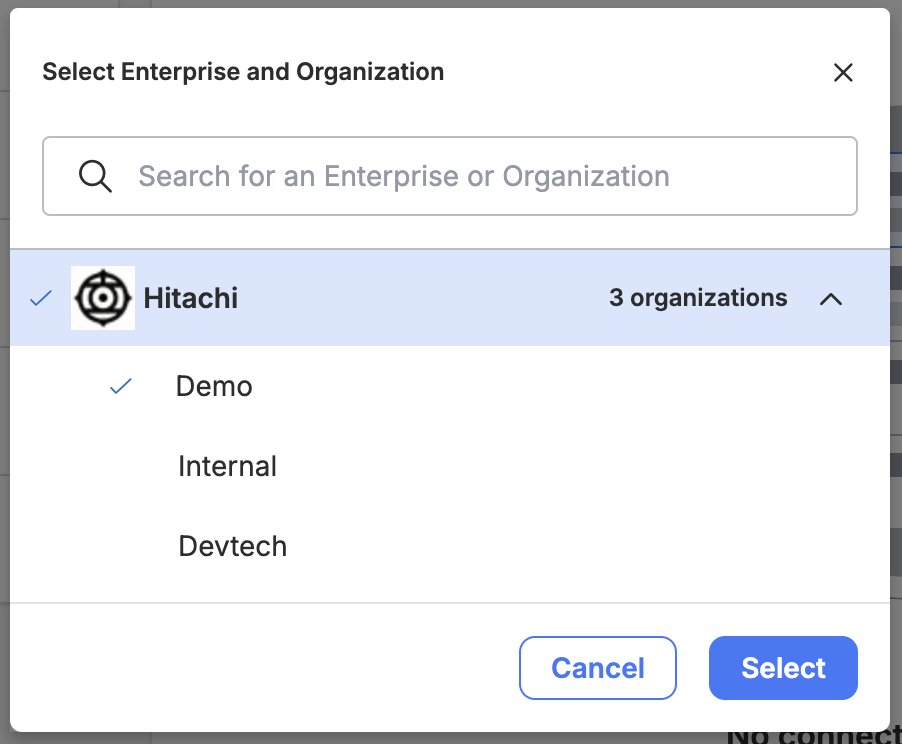
Enterprise: Highest-level container. It represents your entire company or tenant. It contains all organizations, users, and environments. A single SSO is assigned per Enterprise.
-
Organization: Groups related teams, departments, or use cases to logically separate work and manage access. Typically used to delineate physical location, permissions, or even separate contracts within an Enterprise.
You may have one or more environments depending on the needs of your company and what was setup during your initial onboarding.
-
Enterprise: Within an organization, the environment represents a deployment stage (e.g., Development, Test, Production). These are customizable and were setup during your initial onboarding.
Environments allow you to have a safe way to build and test before implementing changes into your live production environment through Data Migrations.
You can navigate between your organization(s) and environments from the header of Empower.
Data Storage
Empower-managed storage can use lifecycle policies to help optimize storage costs over time.
Tiered Blob Storage Policy
Empower supports tiered blob storage policies using Azure lifecycle management rules. These policies automatically move older data into lower-cost storage tiers based on access patterns.
Why this matters
Recently ingested data is typically accessed more often than older data. Keeping all data in the highest-cost storage tier increases storage spend. Automated tiering helps reduce manual storage management.
Automated Data Storage Policy
Hot → Cool → Cold
- Newly ingested data is stored in Hot Storage
- Data not accessed for 30 days moves to Cool storage
- Data not accessed for 90 days moves to Cold storage
Policy Behavior
- Policies are evaluated automatically by Azure Storage
- Applies to blob storage within Empower-managed data lake environments
- Data is transitioned between tiers without manual intervention
- No changes are required to existing pipelines or workflows
- Uses last access time to determine when data should transition tiers
Updated about 1 month ago