SQL Server Publishing
Empower supports publishing datasets to SQL servers automatically when the underlying data is updated.\
Prerequisites
- A SQL server and its credentials.
- Data in your Empower delta lake to publish.
- Advanced Options is toggled on for your account.
Steps
Add the SQL server as a Data Source in your Empower deployment
- Navigate to your Empower deployment's Data Sources tab in the UI.
- Click + to add a new data source, navigate to SFTP or use the search bar.
- Fill in the required fields:
- Server name
- Database name (schema)
- Username
- Password
- Always Encrypted (toggle)
- Trust Server Certificate (toggle)
- Encrypt (toggle)
- Persist Security Info (toggle
- Connection Timeout (optional in seconds)
- Click save and connect to save the new SQL data source.
Configure DatabaseToStepCommand
- Navigate to the Advanced Options tab on the left side of the screen.
- Add a new record to the DatabaseToStepCommand table.
- Use the SQL server in the Database ID field.
- Configure this record to be a PUBLISH a PUBLISH phase.
- Select a new load group number if you want this to run independently OR add to an existing loadgroup to have it run with the rest of that load group.
- Write 1 for the Execution Order field if this is the only command to be executed; otherwise configure to be in whatever order you wish.
- You can leave the Source Schema Suffix and Target Schema Suffix fields as they are defaulted.
- You can leave the Item Name to Execute field set to None.

Configure Publish Entity Table
- Identify the entities (tables) you want to publish to the target SQL server.
- Create a new record for each table you wish to publish in the Publish Entity Table.
- Ensure each new Publish Entity entry includes at least the following columns:
- Load Group: matches DatabaseToStepCommand entry’s loadgroup.
- Target Entity: this could be name of the entity or desired path (month/date/Target_entity_name) as it will be written to a path in the SQL server.
- Source Catalog: the source table’s Unity Catalog.
- Source Schema: the source table’s schema.
- Source Entity Name: the source table’s name.
- Source Entity Filter: this adds an optional where condition parameter to the (ex: account_type=”Debit”).
- Keep in mind that this filter must be valid SQL (everything that could be part of a SQL WHERE clause, just without the preceding WHERE in the statement).
- For proper behavior, make sure to use fields that are contained within the table you are specifying.
- Target ID: The DatabaseListID of the target SQL server (this should be the same as the DatabaseToStepCommand’s DatabaseID).
- Is Active: only active entities are published, must be set to true for this entity to be enabled.

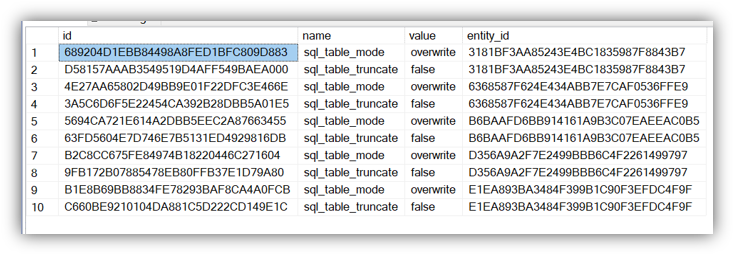
Configure Entity Options Table
- For each of the entities specified in the Publish Entity Table, create an entry in the Entity Options table (using the same entity ID) to define the following options:
- sql_table_mode: defines the mode in which this table will be written to. Select between two choices:
- overwrite: drops the old table if exists and completely overwrite with new data. Note by default this does not include the old indexes
- append: add the new data to the end of this table's existing data
- sql_table_truncate: a boolean value (true or false) which defines index behavior if overwrite is selected in the previous option.
- if true: this will retain the indexes
- if false: indexes will be dropped with the table in overwrite mode
- sql_table_mode: defines the mode in which this table will be written to. Select between two choices:
Configure Retry and Batch Options
-
Retry on Failure (
retry_on_failure)- Defines the behavior when a batch operation fails.
- Options:
- True:
- Attempts to retry row-level publishing for failed batches.
- Logs each failed row for detailed analysis in the row log table.
- False:
- Logs only batch-level success/failures in the batch log table without attempting retries at the row level.
- True:
- Significance: Ensures data consistency while isolating problematic rows.
-
Batch Size (
batch_size)- Defines the number of rows processed per batch.
- Behavior:
- Large batch size: Improves throughput but requires more memory.
- Small batch size: Suitable for constrained environments or granular control.
- Significance: Enhances flexibility and scalability in data processing workflows.
Configure Logging Tables
-
Batch Log Table (
sql_batch_logs)- Logs metadata and outcomes of each batch operation.
- Schema:
batch_log_id: Unique identifier for the batch.timestamp: Timestamp indicating when the batch operation occurred.target_table: The name of the target table in SQL Server.batch_error_message: Error message if the batch fails.sourceRowCount: Total rows in the source data.rowsRead: Number of rows read during processing.rowsSkipped: Number of rows skipped during processing.rowsWritten: Number of rows successfully written to the target table.FailedRecordCount: Count of rows that failed during processing.publishSuccess: Indicates success (1) or failure (0) of the batch operation.
-
Row Log Table (
sql_row_level_logs)- Logs information about individual rows that fail during processing (when
retry_on_failure=True). - Schema:
row_log_id: Unique identifier for the row log entry.batch_log_id: Links the row entry to its parent batch in the batch log table.timestamp: Timestamp indicating when the row operation occurred.target_table: The name of the target table in SQL Server.row_status: Status of the row operation (FAILED,SUCCESS).error_message: Error message detailing the failure for the specific row.\

- Logs information about individual rows that fail during processing (when
Updated 9 months ago
Did this page help you?