Dynamics 365 CE (Dataverse via Synapse Link)


Connector Details
| Connector Attributes | Details |
|---|---|
| Name | Dynamics 365 CE (Dataverse via Synapse Link) |
| Description | Dynamics 365 Customer Engagement (CE) Synapse Link is a powerful integration that bridges the gap between Dynamics 365 CE and Azure Synapse Analytics, enabling organizations to seamlessly analyze and derive insights from their customer data. By leveraging Synapse Link, businesses can unlock the full potential of their Dynamics 365 CE data by integrating it with Azure Synapse Analytics, a cloud-based analytics service. This integration allows for real-time data ingestion, processing, and analysis, empowering organizations to gain deeper insights into customer behavior, trends, and preferences. With Dynamics 365 CE Synapse Link, organizations can make data-driven decisions, improve customer engagement strategies, and drive business growth effectively. |
| Connector Type | Class D |
Features
| Feature Name | Feature Details |
|---|---|
| Load Strategies | Full Load, Incremental Load |
| Metadata Extraction | Supported |
| Data Acquisition | Supported |
| Data Publishing | Not Supported |
| Automated Schema Drift Handling | Not Supported |
Source Connection Attributes
| Connection Parameters | Data Type | Example |
|---|---|---|
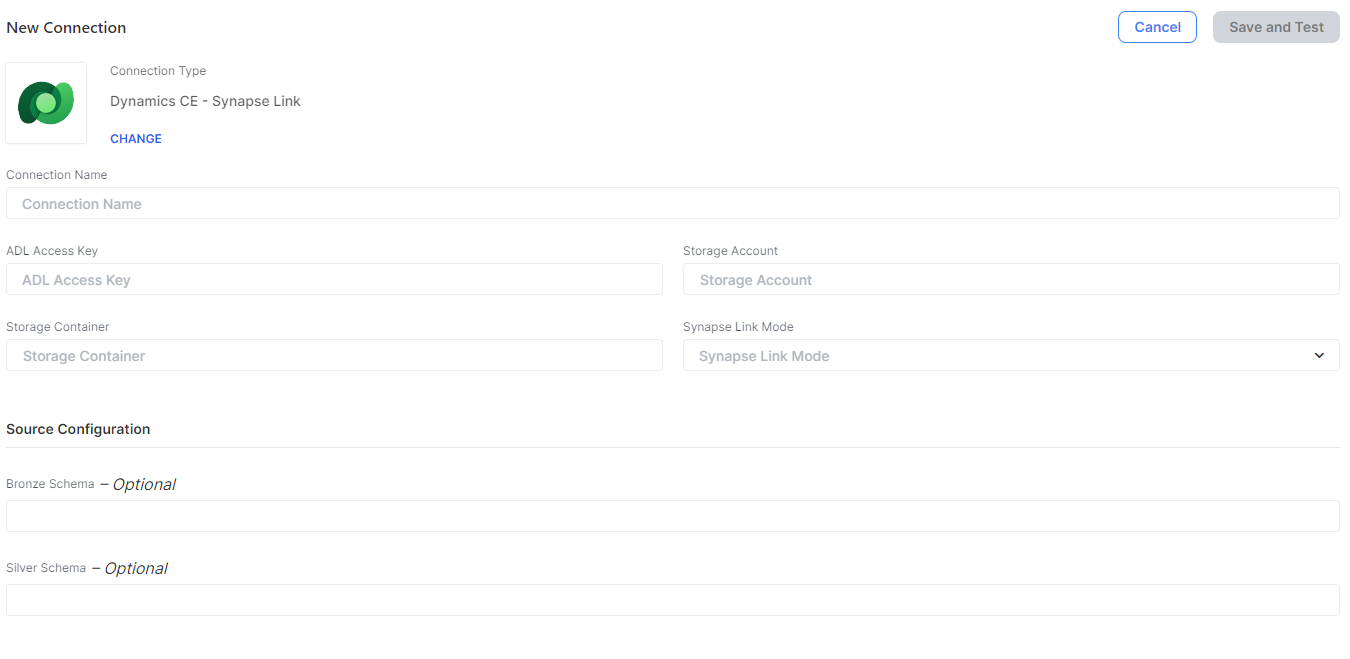
| Connection Name | String | Dynamics365CEConnector |
| ADL Access Key | String | your-adl-access-key |
| Storage Account | String | your-storage-account |
| Storage Container | String | your-storage-container |
| Synapse Link Mode | List | Synapse Link Mode |
| Bronze Schema (Optional) | String | |
| Silver Schema (Optional) | String |
Connector Specific Configuration Details
You must enable Synapse Link for CE before setting up this connector. This connector pulls data from Synapse Link connector which loads data into a Azure Data Lake Gen 2 Storage account.
Synapse Link Prerequisites
Overview
In order to securely export data from Dataverse to Azure Data Lake Storage Gen2 using Synapse Link, we will assign a Managed Identity to Dataverse which can seamlessly authenticate against Azure Data Lake Storage Gen2. In preparation, we must create a Power Platform Enterprise Policy which will enable connecting the Identity to the source Dataverse Environment and allow trusted Azure Services through the Storage firewall.
Limitations
- This process does not work for the PowerApps Dataverse Environments labelled "(Default)".
- This process does not work on macOS with Azure CLI and PowerShell installed.
- Azure Data Lake Storage Gen2 must reside in the same region as Dataverse.
Preparation
- Ensure that you have a Windows computer with PowerShell
- Ensure you have the correct IAM permissions over the resources
- Draft a list of the tables that you want to export from Dataverse
- Ensure these Dataverse tables have "Track changes" property enabled
- Other useful information:
- PowerApps Environment name of the Dataverse
- Azure Tenant ID
- Azure Subscription ID
- Azure Data Lake Storage Gen2 storage account name and resource group
Prerequisites
The following steps are mostly scripted in the Appendix I: Initial Prerequisites PowerShell commands near the bottom of this document.
- Download and install Azure CLI https://aka.ms/InstallAzureCliWindows
- Open a PowerShell terminal and install required PowerShell modules:
- Run
Install-Module -Name Az - Run
Install-Module -Name Microsoft.PowerApps.Administration.PowerShell
- Run
- Download and extract https://github.com/microsoft/PowerApps-Samples/blob/master/powershell/managed-identities/Common.zip
- (Optional) Temporarily set your default subscription to the desired subscription as the default.
- Run
Update-AzConfig -DefaultSubscriptionForLogin <SubscriptionID>
- Run
- Open a terminal and browse to the extracted folder
- Run
cd ./Common
- Run
- Unblock the scripts to ensure they can run
- Enable enterprise policy
- IAM: Azure subscription Owner
- Run
./SetupSubscriptionForPowerPlatform.ps1 - Description: This script registers the Azure subscription for Microsoft.PowerPlatform resource provider and also allow lists the subscription for the enterprise policies preview feature
- Create enterprise policy
- IAM: Azure resource group Owner
- Run
./CreateIdentityEnterprisePolicy.ps1 - Description: This script generates a Microsoft.PowerPlatform enterprise policy under a certain Azure subscription and resource group
- Grant reader access to the enterprise policy
- IAM: Azure subscription Owner or User Access Administrator
- Find the ObjectID for Dynamics365 or PowerPlatform Admin user
- Find the enterprise policy ID via Azure Resource Graph Explorer with the query:
resources | where type == 'microsoft.powerplatform/enterprisepolicies' - Run
New-AzRoleAssignment -ObjectId <objId> -RoleDefinitionName Reader -Scope <EP Resource Id>
- Connect enterprise policy to Dataverse environment
- IAM: Power Platform administrator or Dynamics 365 administrator
- Run
./NewIdentity.ps1 - Description: This script links or swaps the generated Microsoft.PowerPlatform enterprise policy to a certain Dataverse environment
- Configure network access to the Azure Data Lake Storage Gen2
- IAM: Azure Data Lake Storage Gen2 Owner
- Run:
Update-AzStorageAccountNetworkRuleSet -ResourceGroupName "<resourceGroupName>" -Name "<storageAccountName>" -DefaultAction "Deny" -Bypass "AzureServices"
Synapse Link (CE) Setup Instructions
Important: Be sure you have completed the Synapse Link Prerequisites above.
- IAM:
- Dataverse system administrator security role
- Azure Data Lake Storage Gen2 Owner and Storage Blob Data Contributor
- Dataverse: tables must have Track changes property enabled
- Storage:
- Hierarchical namespace
- Allow storage account key access
-
You must have a Storage Account per D365 environment in the Azure Region of your D365 Environment (if you not sure you can see the region in the interface below). This storage account should NOT be exposed to the internet since it contains your sensitive data.
- PLEASE NOTE: The Empower infrastructure team can setup these storage accounts for you. Please reach out to us via your delivery manager with a reference to this page and we can assist you in setting this up securely.
- To enable Synapse Link to securely access your storage account
-
Go to the Maker Portal at https://make.powerapps.com
-

Click More -> Discover All:
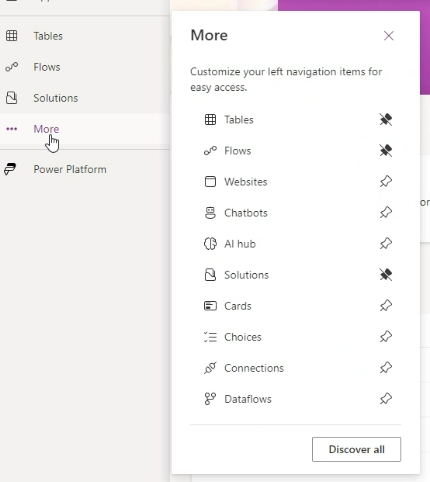
-
Click Azure Synapse Link:

-
Click New Link:

-
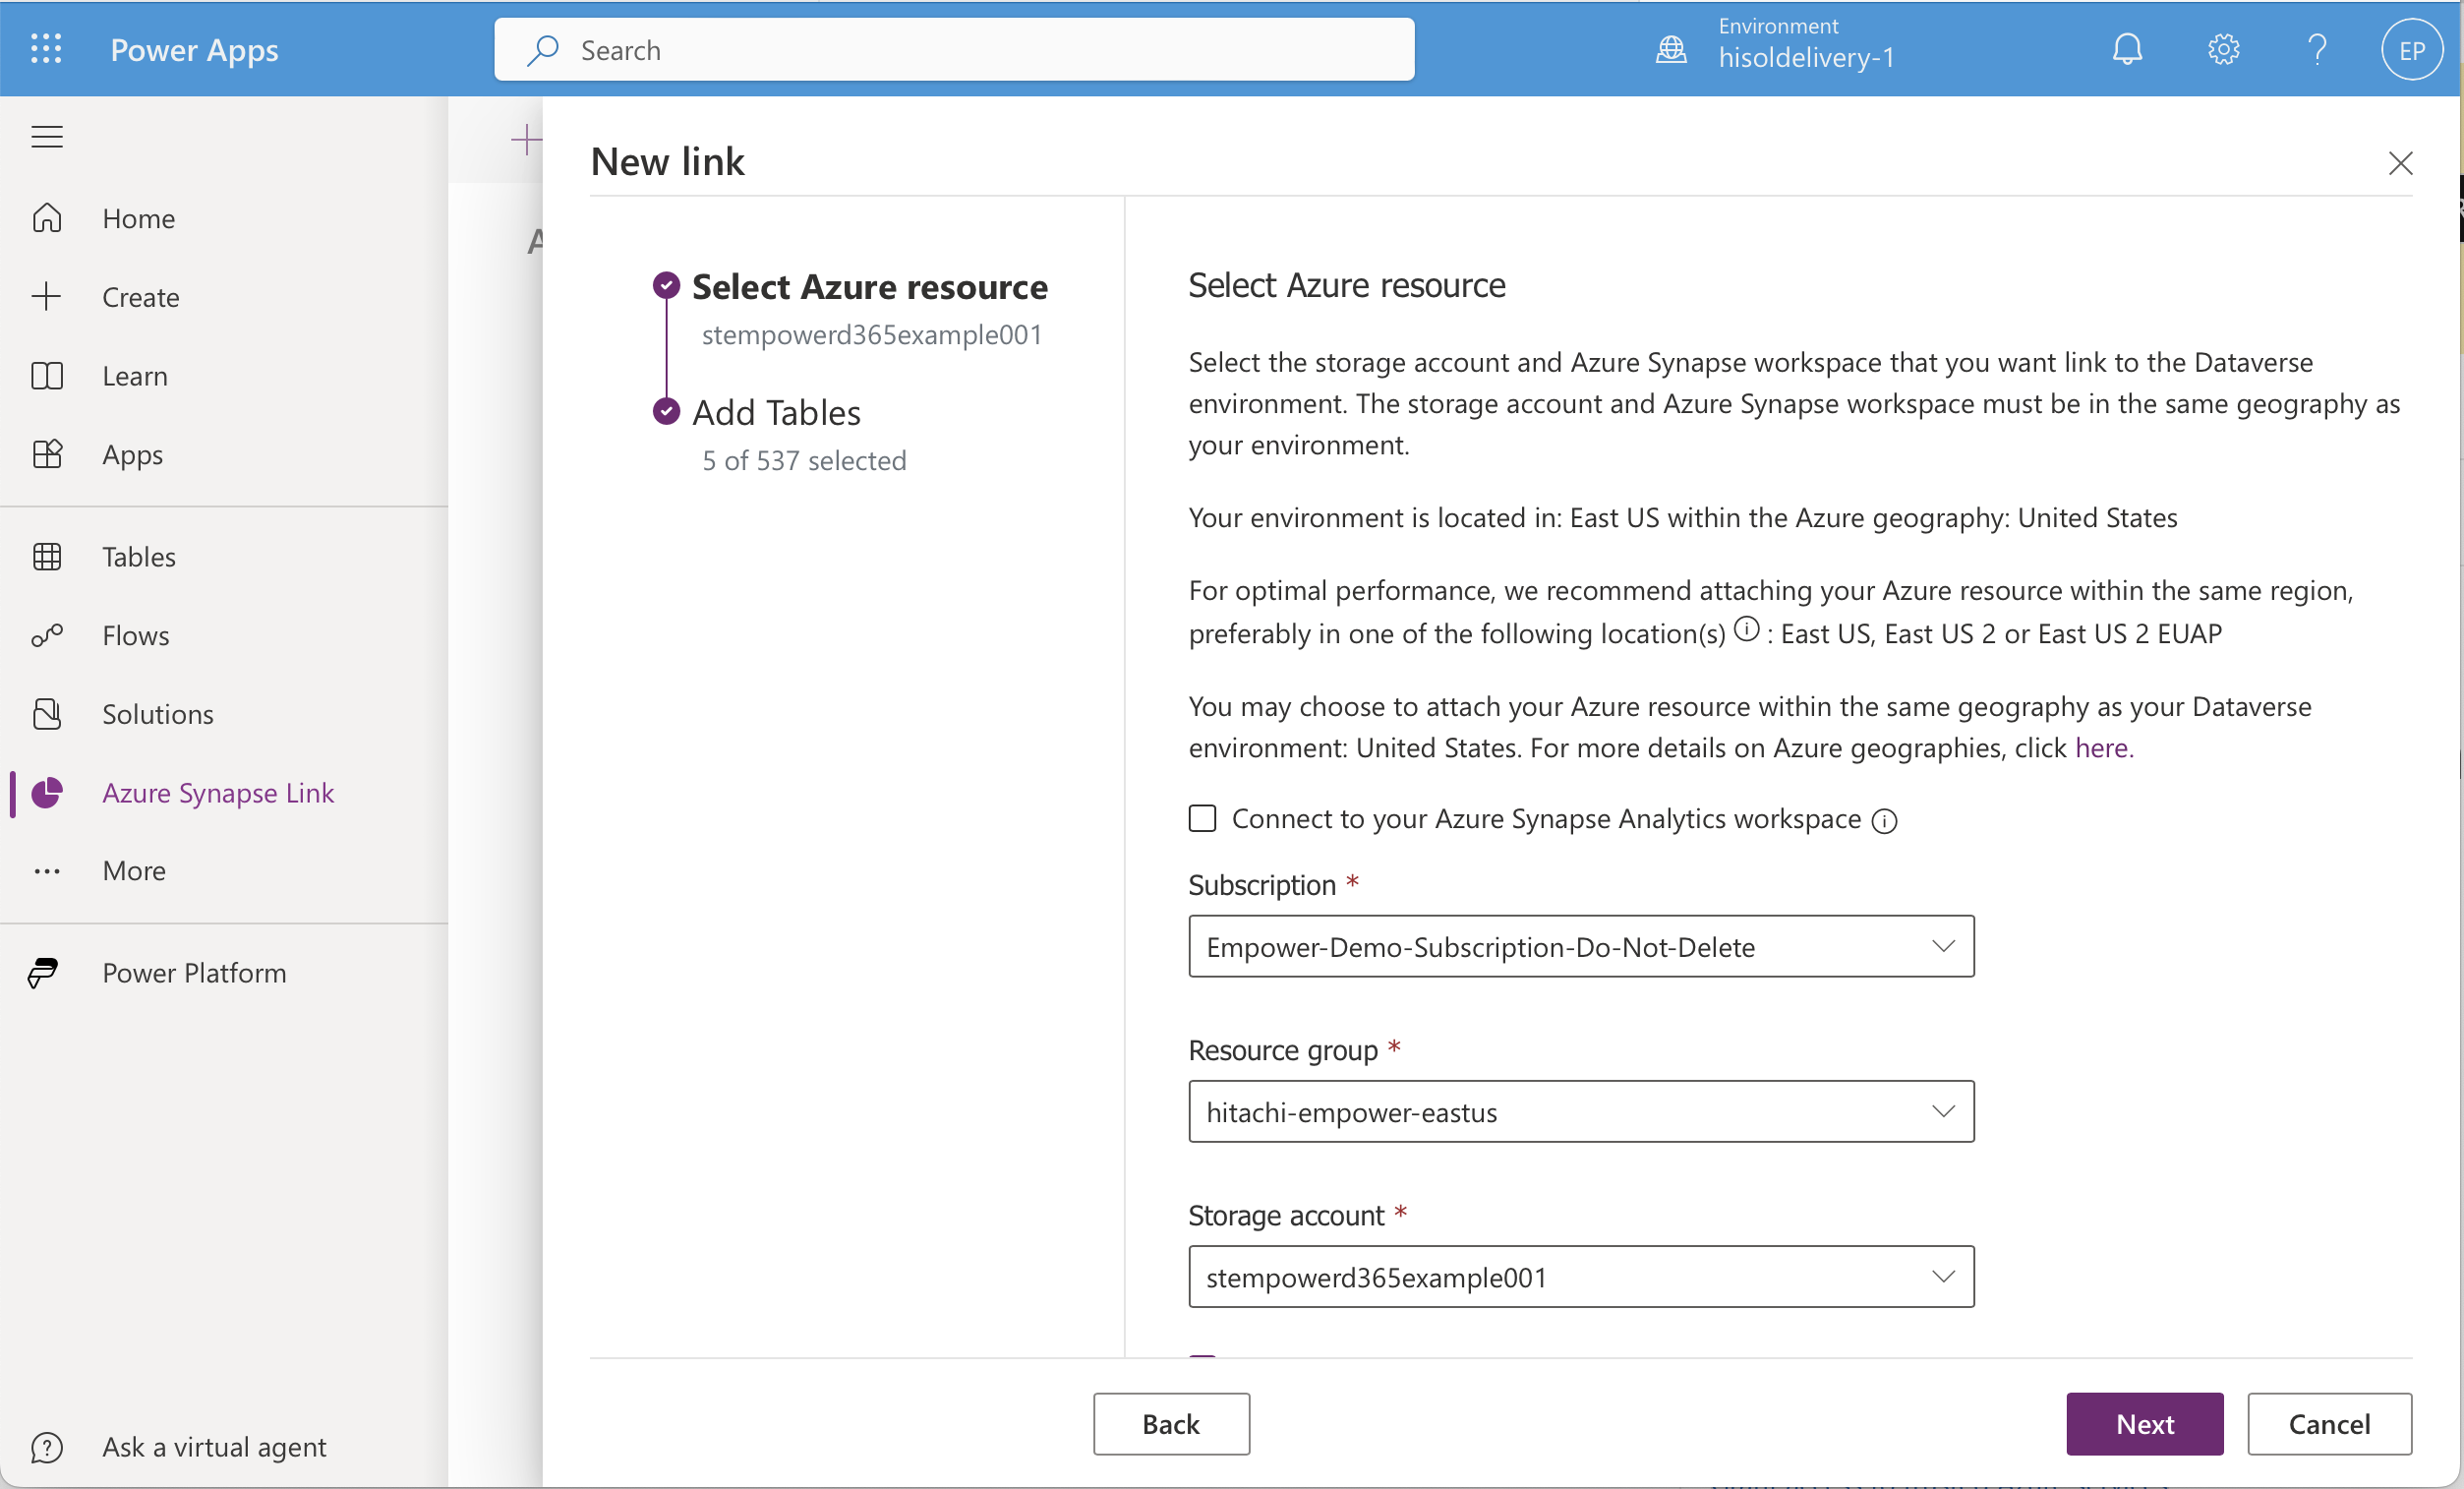
A new blade will open which will allow you to perform the final linkage. Take the following steps:
- Do not check "Connect to your Azure Synapse Analytics workspace."
- Select the subscription for your empower (Non)-Prod subscription, depending on which Maker environment you are currently configuring.
- Select the resource group for your environment.
- Select the specific storage account setup for D365. Do not select your base data lake.
- Check "Enterprise Policy With Managed Service Identity."
- Press Next.
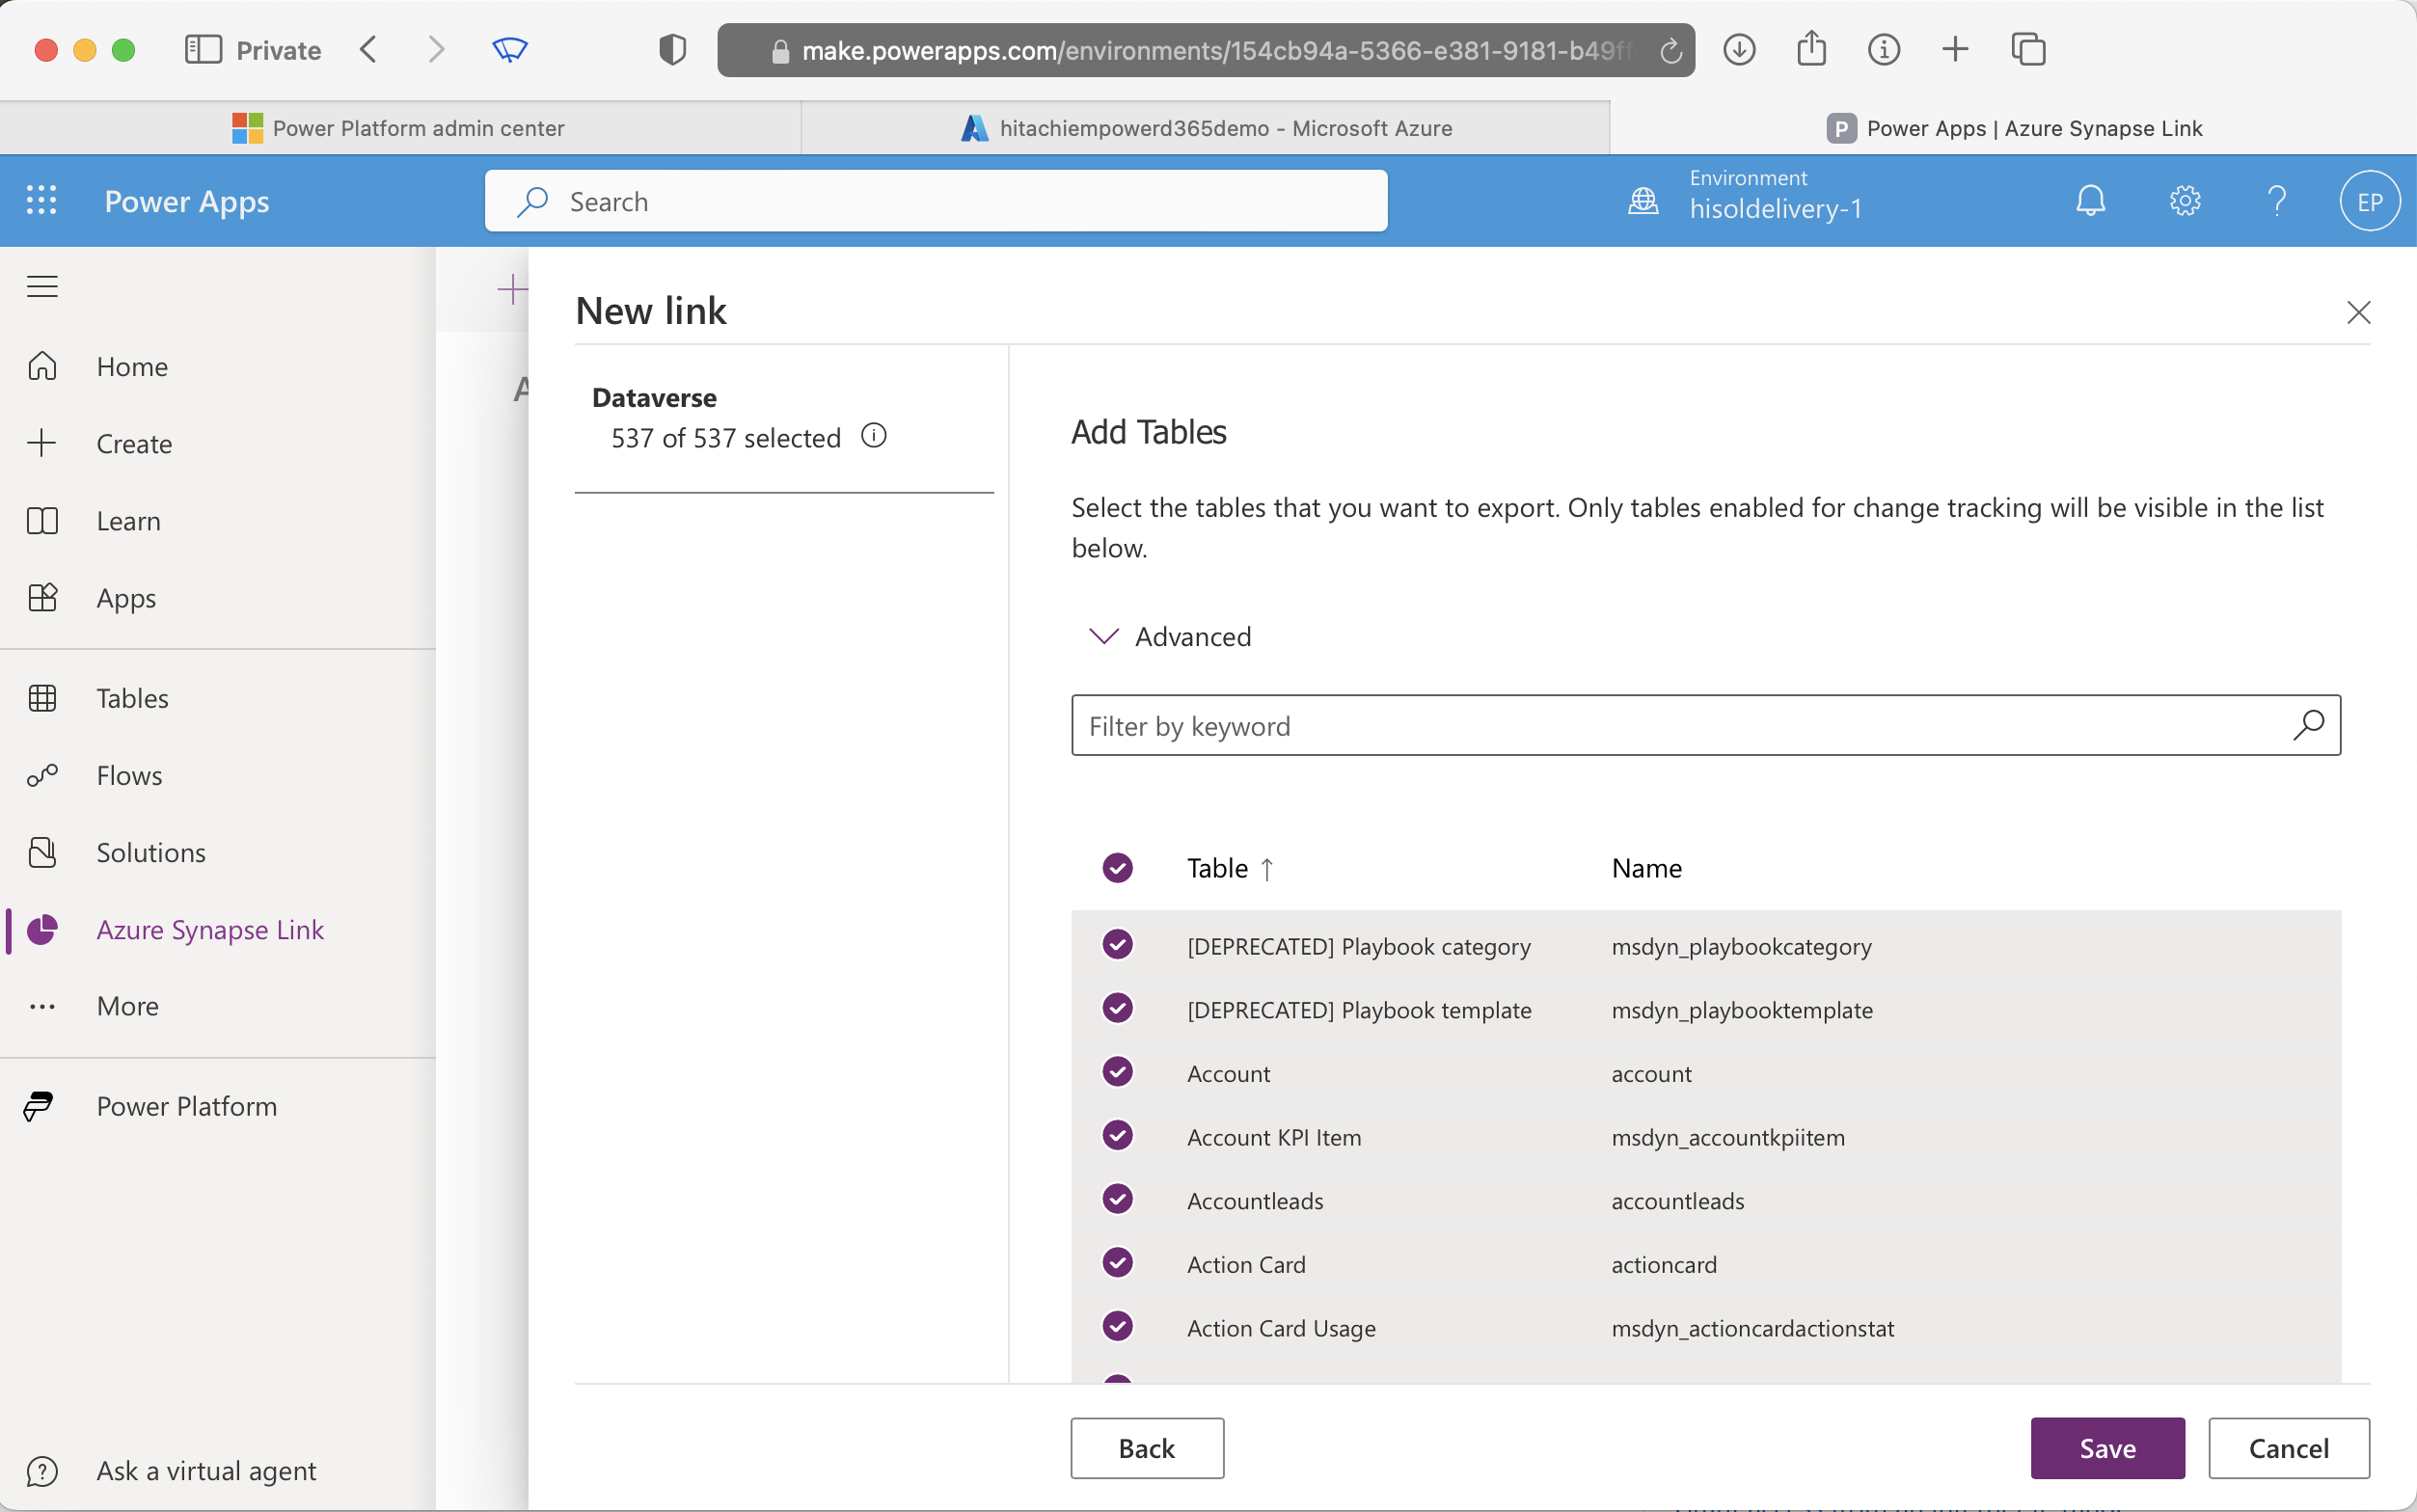
-
At this point, select the tables you wish to replicate.
Additional Information
- Dynamics 365 CE (Dataverse via Synapse Link) connector has optional values such as Bronze Schema and Silver Schema
- Incremental extraction is supported in the connector. The incremental step has been optimized to identify the table partitions that could contain incremental data by comparing the watermark start date to the modified times of the files.
- An incremental extraction should use the sinkmodifiedon column as the watermark and the id and versionnumber columns as the candidate key.
Screenshot To Use Connector
Appendix I: Initial Prerequisites PowerShell commands
Please paste the following commands one-by-one, as most will require manual inputs.
Note: The identifier examples below are for instructional purposes and will not work.
# IMPORTANT: Please download via web browser and unzip. @see https://stackoverflow.com/a/56030142
# Invoke-WebRequest -Uri "https://github.com/microsoft/PowerApps-Samples/blob/master/powershell/managed-identities/Common.zip" -OutFile "Common.zip"
# Expand-Archive -Path "Common.zip" -DestinationPath "Common"

# Unblock downloaded PowerShell scripts
Get-ChildItem -Recurse ./Common/ | Unblock-File

##################################################
# Install required PowerShell modules
##################################################

Install-Module -Name Az
Install-Module -Name Microsoft.PowerApps.Administration.PowerShell

# login to Azure
Connect-AzAccount -DeviceCode

# Set these values before proceeding
$tenantId = "<YourTenantId>" # example: "1ac891cf-bf47-45c1-ba95-a2ffc17913fd"
$subscriptionId = "<YourSubscriptionId>" # example: "441d66e8-3496-466b-92ac-f98affe43d8b"

# Set default subscriptionId
Update-AzConfig -DefaultSubscriptionForLogin $subscriptionId

# Set the context
Set-AzContext -Tenant $tenantId -Subscription $subscriptionId

##################################################
# Enable enterprise policy for the subscription
##################################################

# Enable
Get-ChildItem -Recurse ./Common/ | Unblock-File

cd ./Common

./SetupSubscriptionForPowerPlatform.ps1
# Provide the Azure subscription ID.

##################################################
# Create enterprise policy
##################################################

cd ./Identity
$enterprisePolicyName = "<YourEnterprisePolicyName>" # example: policy-dataverse-identity
./CreateIdentityEnterprisePolicy.ps1
# Provide the Azure subscription ID. # example: 441d66e8-3496-466b-92ac-f98affe43d8b
# Provide the enterprise policy name. # example: policy-dataverse-identity
# Provide the Azure resource group location.  # example: unitedstates

##################################################
# Grant reader access to the enterprise policy
##################################################

# Get the user's Object ID from MS Entra Email
# This may be repeated for any users who should be able to read the Enterprise Policy
$email = "<YourMsEntraEmailHere>" # example: [email protected]
$objectId = (Get-AzADUser -UserPrincipalName "$email").Id

# Ensure you have the Az.ResourceGraph module installed
Install-Module -Name Az.ResourceGraph -Force -AllowClobber

# Obtain the enterprise policies ID
$query = "resources | where type == 'microsoft.powerplatform/enterprisepolicies' and name matches regex @'$enterprisePolicyName$'"

# Copy/paste the Enterprise Policy ID to this variable
$enterprisePolicyResourceId = (Search-AzGraph -Query $query).id # example: /subscriptions/<subscriptionId>/resourceGroups/<resourceGroupName>/providers/Microsoft.PowerPlatform/enterprisePolicies/policy-dataverse-identity
# Assign
New-AzRoleAssignment -ObjectId $objectId -RoleDefinitionName Reader -Scope $enterprisePolicyResourceId

##################################################
# Connect enterprise policy to Dataverse environment
##################################################

# Print Enterprise Policy ID to make it easy to copy/paste
Write-Host "$enterprisePolicyResourceId"

./NewIdentity.ps1
# Provide the Dataverse environment ID. # example: 73db3855-111c-4fc6-9134-0f7f3545c6cb
# Provide the Enterprise Policy Resource ID. # example: /subscriptions/<subscriptionId>/resourceGroups/<resourceGroupName>/providers/Microsoft.PowerPlatform/enterprisePolicies/policy-dataverse-identity

##################################################
# Configure network access to the Azure Data Lake Storage Gen2
##################################################

# set email again, in case more than 1 user was granted Reader role before
$email = "<YourMsEntraEmailHere>" # example: [email protected]
$resourceGroupName = "<YourResourceGroupName>" # example: my-example-resource-group
$storageAccountName = "<YourStorageAccountName>" # example: stexampleeastus001

# Get the user's Object ID from MS Entra Email
$objectId = (Get-AzADUser -UserPrincipalName "$email").Id

# Assign "Storage Blob Data Contributor" role to self
$roleName = "Storage Blob Data Contributor"
$storageAccountId = (Get-AzStorageAccount -ResourceGroupName $resourceGroupName -Name $storageAccountName).Id
New-AzRoleAssignment -ObjectId "$objectId" -RoleDefinitionName "$roleName" -Scope "$storageAccountId"

# Update the network rule set to allow trusted Azure services
Update-AzStorageAccountNetworkRuleSet -ResourceGroupName "$resourceGroupName" -Name "$storageAccountName" -DefaultAction "Deny" -Bypass "AzureServices"
Reference
- Microsoft Learn / Power Platform / Power Apps / Dataverse / Use managed identities for Azure with your Azure data lake storage / Create a new Azure Synapse Link for Dataverse with managed identity https://learn.microsoft.com/en-us/power-apps/maker/data-platform/azure-synapse-link-msi#create-a-new-azure-synapse-link-for-dataverse-with-managed-identity
Updated about 2 months ago