SharePoint
Connector Details
| Connector Attributes | Details |
|---|---|
| Name | SharePoint |
| Description | The SharePoint connector enables seamless integration with Microsoft's SharePoint platform, facilitating efficient collaboration, document management, and content sharing across teams and organizations. With the SharePoint connector, users can easily connect to their SharePoint sites, allowing access to files, folders, and lists for streamlined workflows and enhanced productivity. Whether retrieving or updating content, the connector simplifies the management of large volumes of documents, ensuring compliance and version control. Its robust support for real-time collaboration, metadata organization, and secure file sharing empowers organizations to maintain operational efficiency, drive knowledge sharing, and improve decision-making processes across departments. |
| Connector Type | Class B |
Features
| Feature Name | Feature Details |
|---|---|
| Load Strategies | Full Load |
| Metadata Extraction | Supported |
| Data Acquisition | Supported |
| Data Publishing | Not Supported |
| Automated Schema Drift Handling | Not Supported |
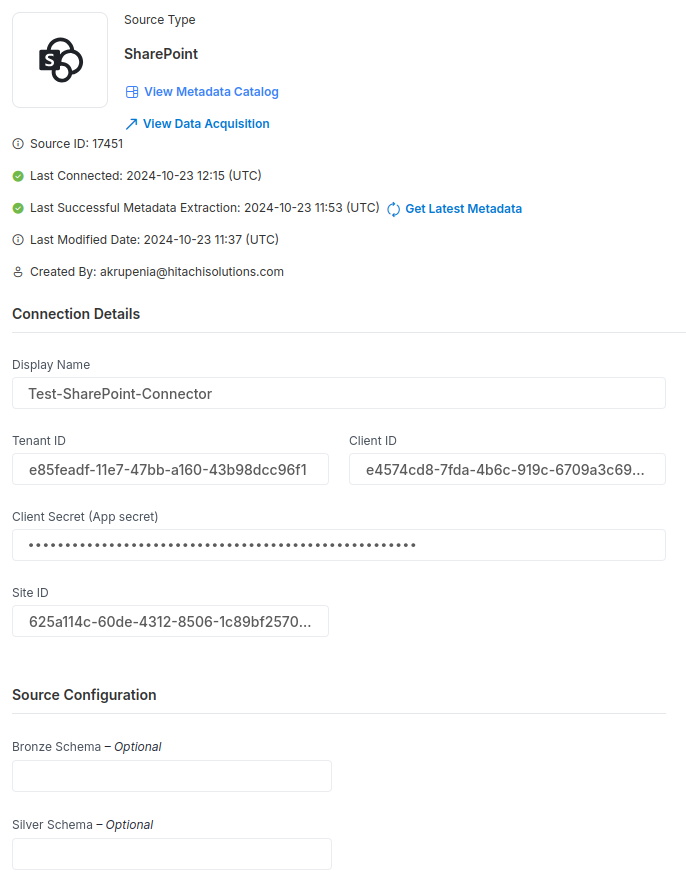
Source Connection Attributes
| Connection Parameters | Data Type | Example | |
|---|---|---|---|
| Connection Name | String | SHAREPOINT | |
| Tenant ID | String | <Tenant ID> | |
| Client ID | String | <Client ID> | |
| Client Secret (App secret) | String | <App secret> | |
| Site ID | String | <Site ID> | |
| Silver Schema (Optional) | String | ||
| Bronze Schema (Optional) | String |

Connector Specific Configuration Details
Supported formats:
- CSV
- JSON
The Empower Microsoft SharePoint connector requires registering an application in the Azure Tenant's The connector will then connect to and authenticate with the Entra ID Graph API.
Below are the steps to register and assign permissions.
Create an Azure AD Application
1. Log in to the Azure Portal
- Go to the Azure Portal and sign in with your credentials.
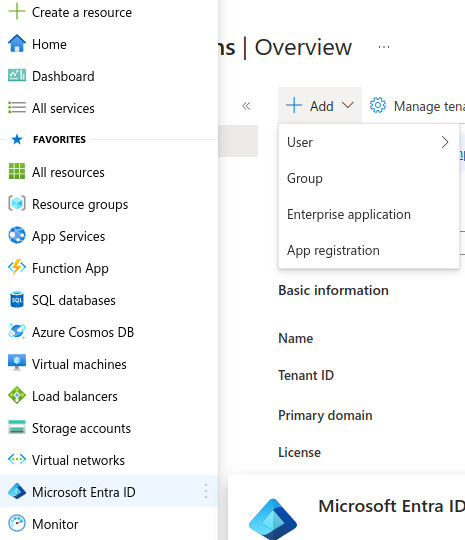
2. Navigate to Microsoft Entra ID
- In the left-hand menu, click on Microsoft Entra ID.

3. Register a New Application
- In the Microsoft Entra ID section, select App registrations.
- Click
+ Addat the top of the screen.
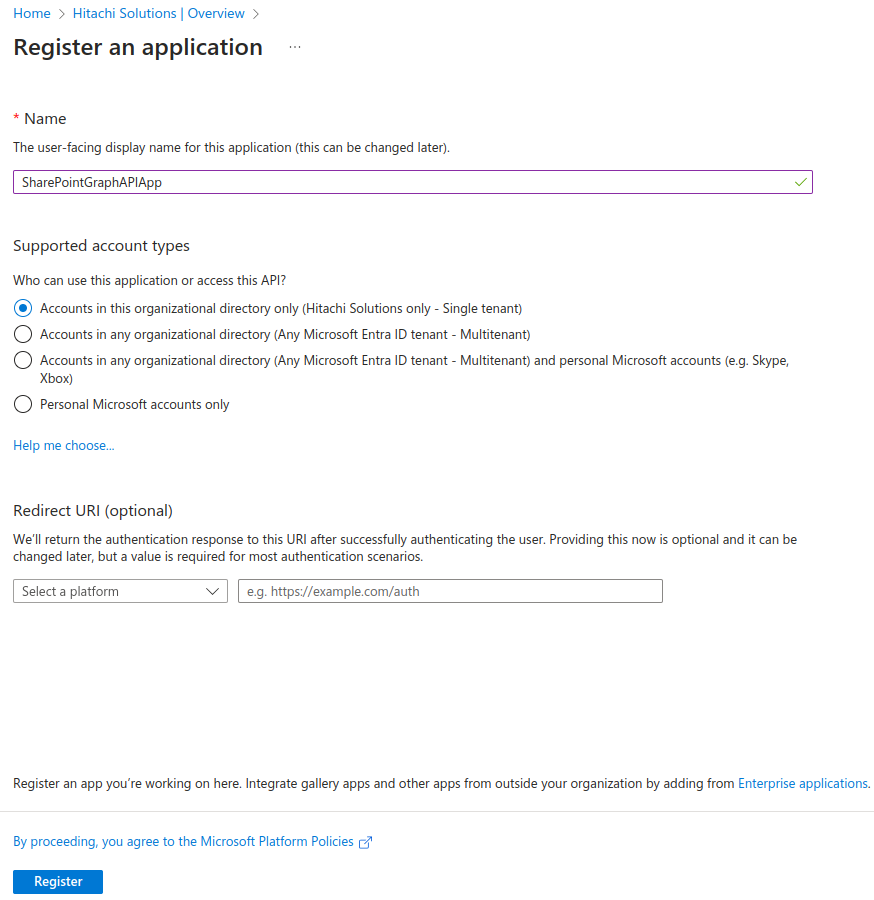
4. Configure App Registration
- Name: Enter a name for your application (e.g.,
SharePointGraphAPIApp). - Supported Account Types: Choose the option that applies to your application, for example:
- Accounts in this organizational directory only (Single tenant) for internal apps.
- Redirect URI: You can leave this blank for now, or set it based on your app’s needs (e.g., a backend service might not need this initially).
- Once everything is configured, click
Register.
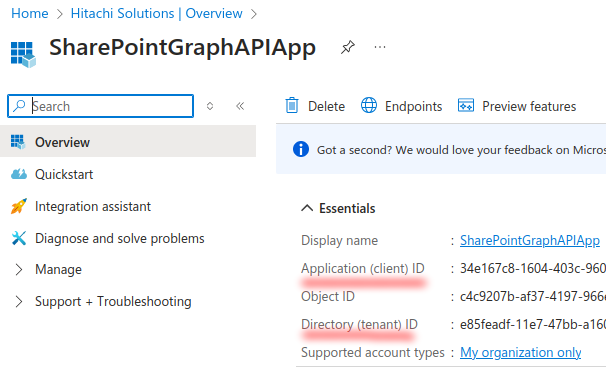
5. Save Application (Client) ID and Directory (Tenant) ID
- After registering the application, you'll see its Overview page. Copy and save both the Application (Client) ID and the Directory (Tenant) ID. You’ll need these values for your backend configuration.
Create a Client Secret
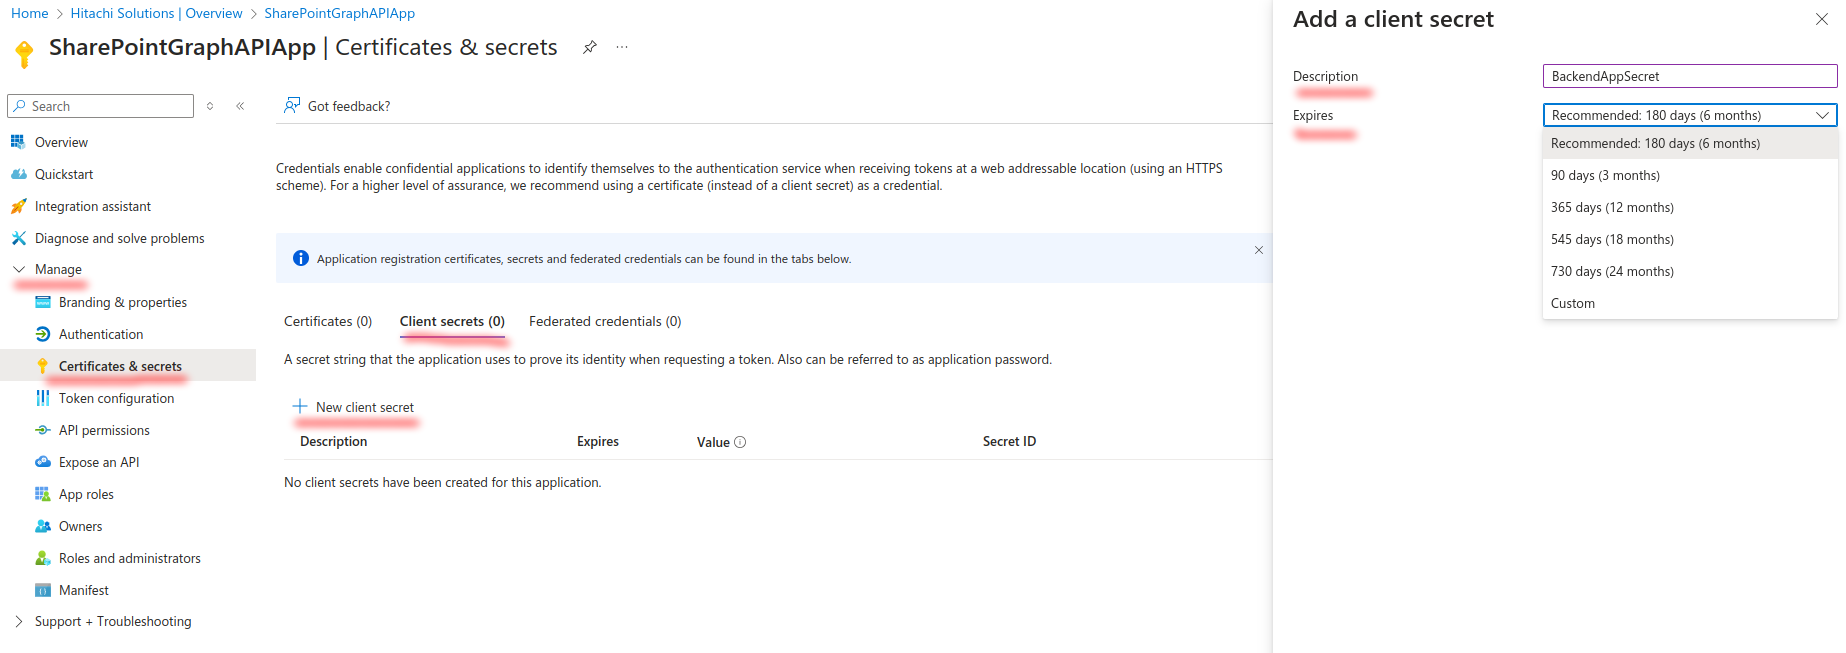
1. Navigate to Certificates & Secrets
- On your app’s Overview page, in the left-hand navigation menu, click Certificates & secrets.
2. Create a New Client Secret
- Under the Client secrets section, click
+ New client secret. - Description: Add a description (e.g.,
BackendAppSecret). - Expiration: Select an expiration duration (e.g., 6 months, 12 months, or 24 months). You will need to rotate this secret periodically based on the expiration.
3. Save the Client Secret Value
- After creating the secret, copy the Value immediately. You won’t be able to view it again once you navigate away from this page.
- This Client Secret Value will be used later in the backend application for authentication.

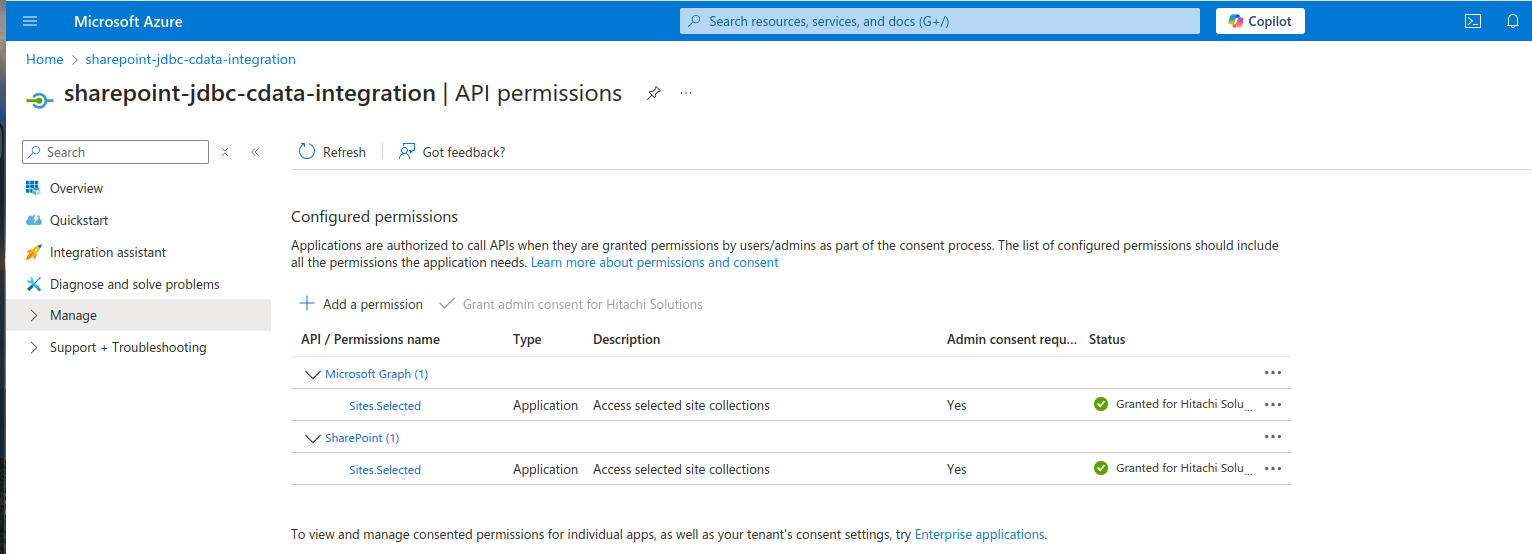
Grant API Permissions
1. Navigate to API Permissions
- In the left-hand menu, select
API Permissions.

2. Add Microsoft Graph Permissions
- Click on
+ Add a permission. - In the Request API permissions window, select Microsoft Graph.
3. Choose the Appropriate Permissions
- For the actions your backend app will perform in SharePoint, you’ll need to select
Applicationpermissions.
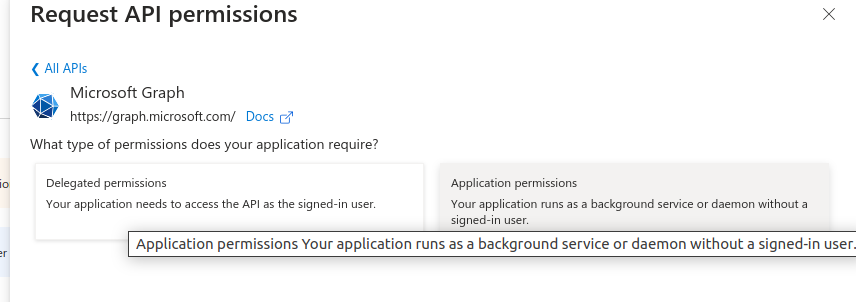
Common Permissions for SharePoint:
- Delegated Permissions: If your app acts on behalf of a signed-in user, choose from permissions like
Sites.Read.All,Sites.ReadWrite.All,User.Read, etc. - Application Permissions: If your app accesses data without a signed-in user, select permissions such as
Sites.Read.All,Sites.ReadWrite.All, etc. - Select the necessary permissions for your app and click
Add permissions.
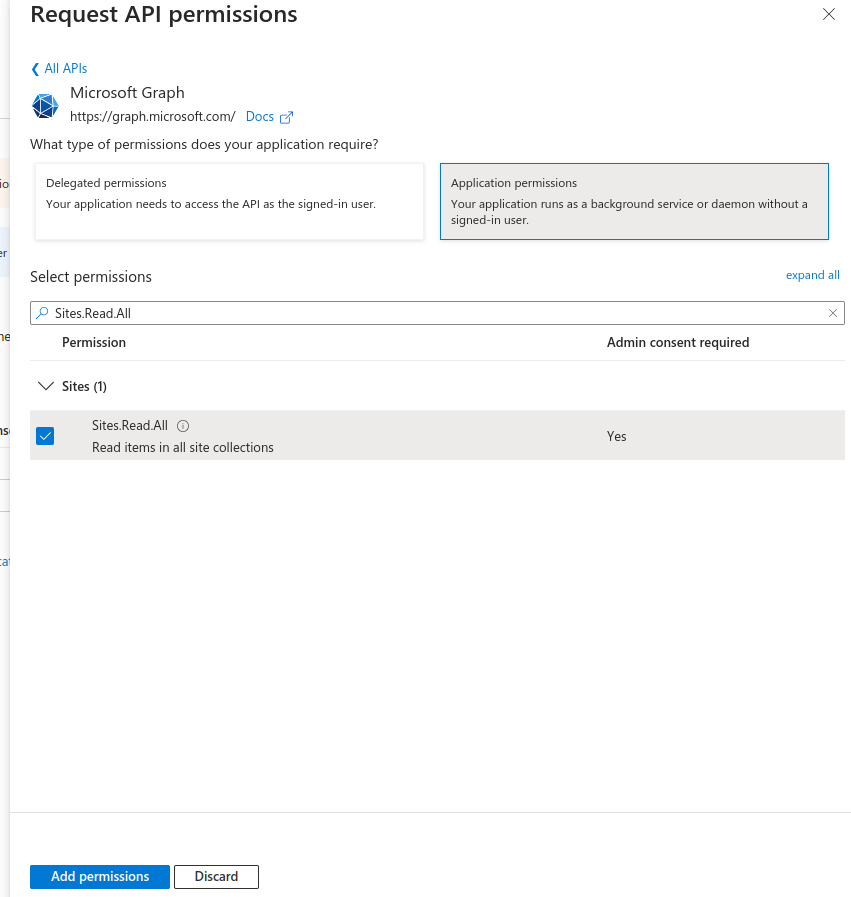
4. Grant Admin Consent (If Required)
- Some permissions (especially Application permissions) may require Admin Consent. Click
Grant admin consent for {Your Organization}to allow these permissions.

Finding the SharePoint Site ID
1. Log in to SharePoint and navigate to the site you wish to connect to SharepoinConnector.
SharepoinConnector.2. Go to the Home page and copy the URL of the site.
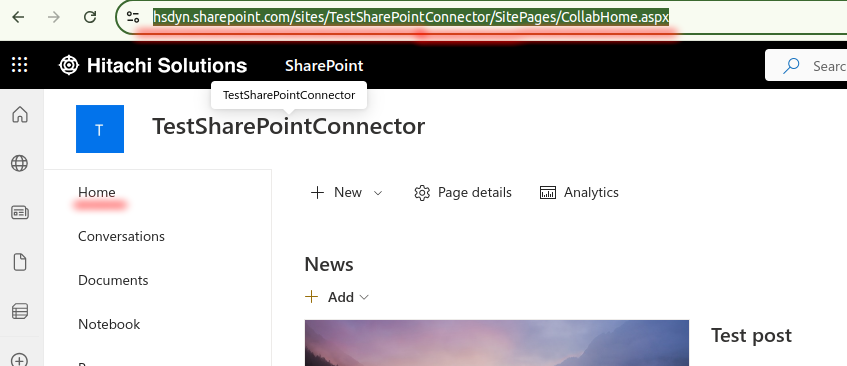
3. Append /_api/site/id to the copied URL. Enter this new URL in your browser's address bar.
/_api/site/id to the copied URL. Enter this new URL in your browser's address bar.
4. You’ll see the Site ID displayed on the page. Make sure you're signed in to your SharePoint account when performing this step.
Note down the Site ID as you will need it for the next steps.
Setting Up Read Access for a SharePoint Site via Microsoft Graph API (Optional)
Using Microsoft Graph API, this manual demonstrates how to grant read access to a specific user or group for a SharePoint site. Ensure you have the necessary permissions and prerequisites before proceeding.
Prerequisites
-
Microsoft Graph API Permissions:
-
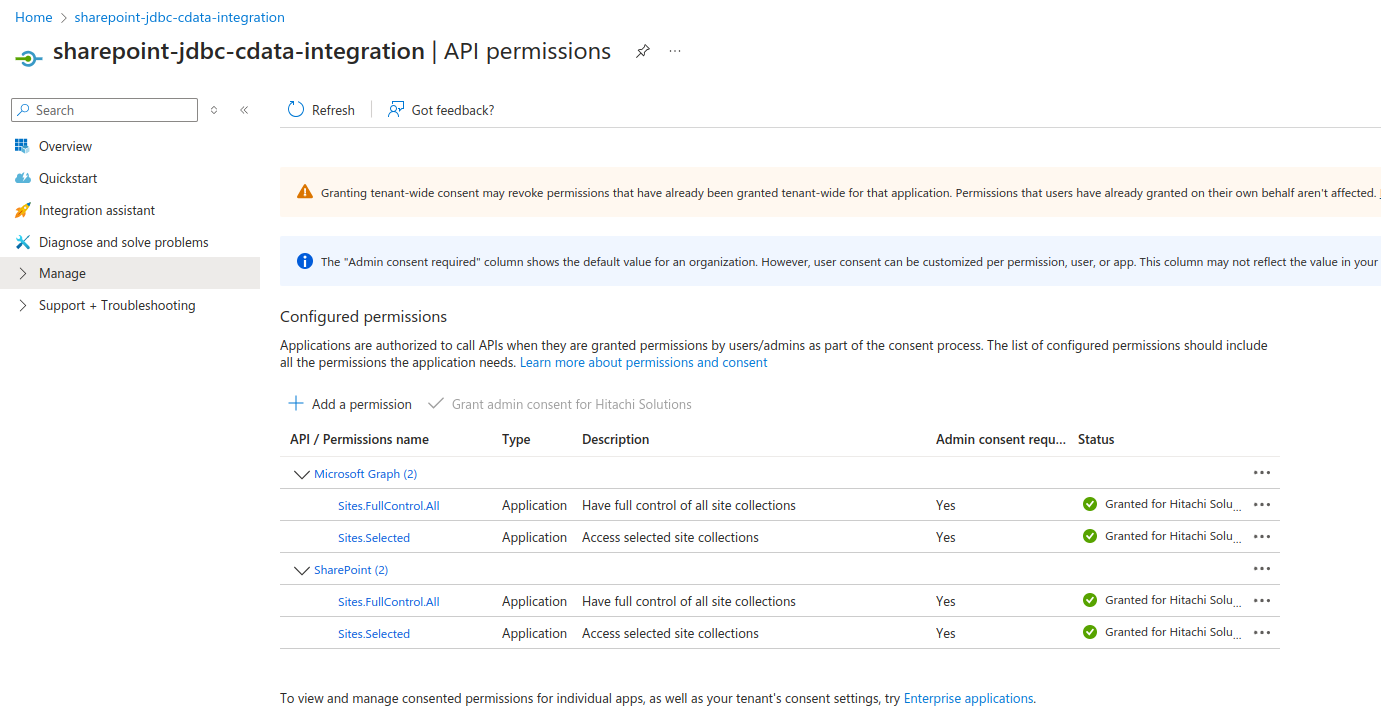
Your application must have the
Sites.FullControl.Allapplication permission to modify site permissions. IMPORTANT! It is necessary for the set read permissions after we do it - you can drop this level of access. Or create a separate application dedicated to managing permissions. -
Ensure these permissions are granted in the Azure portal for your registered app.
-
-
-
Authentication:
- Obtain an access token using Azure AD. Refer to Authenticate with Azure AD.
-
Tools:
- Install
curlfor making HTTP requests or use a REST client likePostman.
- Install
-
Information Needed:
- The site ID of the SharePoint site where you want to set permissions. (You can get it from the previous step)
Step 1: List Existing Permissions
Before modifying permissions, review the current permissions for the site.
Request:
curl -X GET \
  https://graph.microsoft.com/v1.0/sites/{site_ID}/permissions \
  -H "Authorization: Bearer {access_token}" \
  -H "Content-Type: application/json"
Response Example:
{
  "value": [
  {
    "id": "aTowaS50fG1zLnNwLmV4dHxlNDU3NGNkOC03ZmRhLTRiNmMtOTE5Yy02NzA5YTNjNjlhMmVAZTg1ZmVhZGYtMTFlNy00N2JiLWExNjAtNDNiOThkY2M5NmYx",
    "grantedToIdentitiesV2": [
      {
        "application": {
          "displayName": "sharepoint-jdbc-cdata-integration for Limited Access",
          "id": "e4574cd8-7fda-4b6c-919c-6709a3c69a2e"
        }
      }
    ],
    "grantedToIdentities": [
      {
        "application": {
          "displayName": "sharepoint-jdbc-cdata-integration for Limited Access",
          "id": "e4574cd8-7fda-4b6c-919c-6709a3c69a2e"
        }
      }
    ]
  }
]
}roles: Shows the permission level (e.g.,read,write).grantedTo**: Identifies the user or group with access.
Step 2: Grant Read Access
To grant read access, use the POST method on the /permissions endpoint of the SharePoint site. Specify the principal (user or group) and the read role in the request body.
Request:
curl -X POST \
  https://graph.microsoft.com/v1.0/sites/{site_ID}/permissions \
  -H "Authorization: Bearer {access_token}" \
  -H "Content-Type: application/json" \
  -d '{
          "roles": ["read"],
          "grantedToIdentities": [{
                 "application": {
                 "id": "<CLIENT_ID>",
                 "displayName": "sharepoint-jdbc-cdata-integration for Limited Access"
                }
          }]
}'Parameters:
roles: Specify the access level. Usereadfor read-only access.grantedToIdentities: Specify the principal (user or group) by email.
Response Example:
{
  "id": "aTowaS50fG1zLnNwLmV4dHxlNDU3NGNkOC03ZmRhLTRiNmMtOTE5Yy02NzA5YTNjNjlhMmVAZTg1ZmVhZGYtMTFlNy00N2JiLWExNjAtNDNiOThkY2M5NmYx",
  "roles": [
    "read"
  ],
  "grantedToIdentities": [
    {
      "application": {
        "displayName": "sharepoint-jdbc-cdata-integration for Limited Access",
        "id": "e4574cd8-7fda-4b6c-919c-6709a3c69a2e"
      }
    }
  ]
}
Step 3: Verify Permissions
After granting access, verify the permissions to ensure they were set correctly.
Request:
permissionId you can get from the previous request: aTowaS50fG1zLnNwLmV4dHxlNDU3NGNkOC03ZmRhLTRiNmMtOTE5Yy02NzA5YTNjNjlhMmVAZTg1ZmVhZGYtMTFlNy00N2JiLWExNjAtNDNiOThkY2M5NmYx
curl -X GET \
  https://graph.microsoft.com/v1.0/sites/{site_ID}/permissions/{permissionId} \
  -H "Authorization: Bearer {access_token}" \
  -H "Content-Type: application/json"
Response Example:
{
  "value": [
    {
      "id": "aTowaS50fG1zLnNwLmV4dHxlNDU3NGNkOC03ZmRhLTRiNmMtOTE5Yy02NzA5YTNjNjlhMmVAZTg1ZmVhZGYtMTFlNy00N2JiLWExNjAtNDNiOThkY2M5NmYx",
      "roles": ["read"],
      "grantedToIdentities": [
       {
        "application": {
        "displayName": "sharepoint-jdbc-cdata-integration for Limited Access",
        "id": "e4574cd8-7fda-4b6c-919c-6709a3c69a2e"
        }
      }
    ]
   }
  ]
}
The new permission should now appear in the permissions list.
In this step, you can remove the Sites.FullControl.All permission from your application.
However, keep in mind that doing so will also revoke your ability to manage permissions using the Microsoft Graph API. If you still need to perform actions related to permissions via the Graph API, you have two options:
- Create a dedicated application specifically for managing permissions.
- Restore the
Sites.FullControl.Allpermission to your current app.
Step 4: Remove Access (Optional)
If you need to revoke access, delete the specific permission by its permission-id.
Request:
curl -X DELETE \
  https://graph.microsoft.com/v1.0/sites/{site_ID}/permissions/{permissionId} \
  -H "Authorization: Bearer {access_token}" \
-H "Content-Type: application/json"Response:
A successful deletion returns an HTTP 204 (No Content) status.
Mandatory conditions for the Sharepoint static CSV files:
CSV files:File Format
The connector is designed to handle files only in CSV format. Ensure all files used or processed by the system are in .csv format for compatibility with the connector.
Use of Separator
Always use a comma , as the separator in your data files. This ensures consistency and compatibility across different systems and processes.
Encoding Standard
Ensure that all files are saved and processed using UTF-8 encoding. This is crucial to maintain character integrity, especially when working with international data or special characters.
File Movement or Renaming
When you move or rename a file, it is essential to update the associated metadata. This ensures that all references to the file are accurate and that no processes relying on this data are disrupted.
Replacing a File Without Dropping
If you are replacing a file but not dropping and creating a new one, you can continue to use the same table name. This allows for a seamless transition and minimal disruption to the existing data structure.
Dropping and Creating a New File
When you drop and create a new file with the same name, it is necessary to update the metadata. This ensures that the system properly references and recognizes the new file, preventing potential issues with outdated information.
Screenshot To Use Connector

Updated 3 months ago
